Once Upon A Sweater Vest

As we all know, it’s a rare piece whose maker can say is the best example of all things. Nor should it be, because that’s too much pressure to put on mere mortals with string.

But there are some knitted things which serve as useful examples of certain concepts.

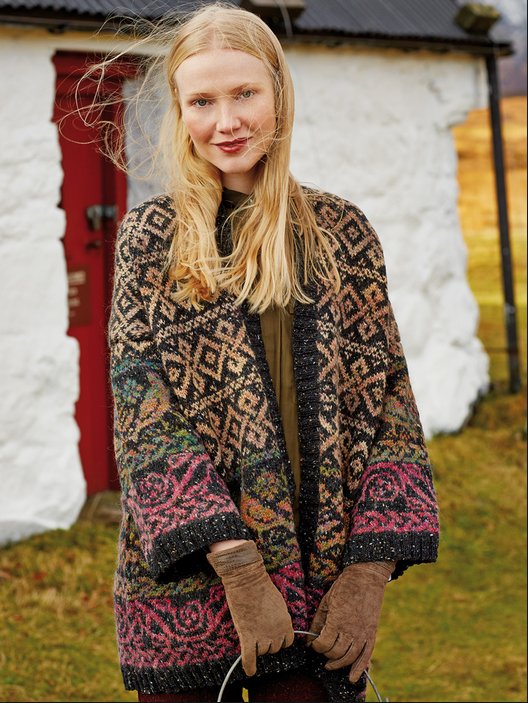
This is one such garment. Flower of Nepal is a little sweater vest I knocked out to wear on tv once, when I learned there are colors and silhouettes that cameras hate. There was little time to spare (surprise) and even less yarn (natch), but lunatic that I am, I elected to knit something new. I used the opportunity/challenge to bang out a vest, with several experimental elements. I didn’t bother to write down any pattern notes, thinking that I wouldn’t need or want to publish the design. Given the unreasonable timeframe (about a week), I would be lucky to get a garment at all, never mind one worthy of the full “pattern-I’m-going-to-sell” treatment.

But it ended up that I quite liked the little vest. Some of the things I tried out on it were successful enough that I began to include it in my sample collection. I only showed it to my steeks students, and usually not on their first introduction to my circus: It’s a little bit thinky for the uninitiated. But for my experienced/returning students (Repeat Offenders), it’s a useful example of some advanced ideas. To wit :

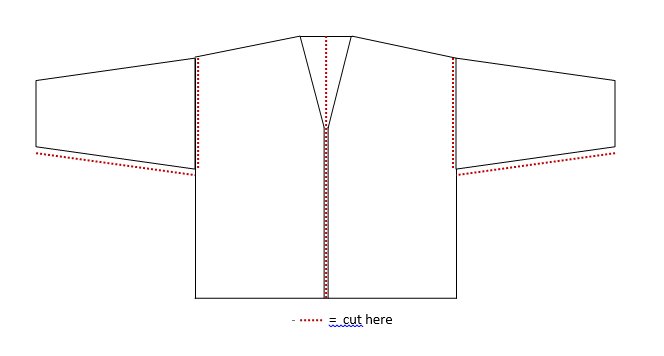
  1. The power of knitted hems to both display repeated motifs and add structure to an otherwise simple shape

  2. The magic of shaping adjacent to cuts in knitted fabric (a cornerstone of my Shapely, Sexy Steeks class)

  3. What happens when sock yarn can becomes a garment, with certain yarn characteristics accounted/adjusted for

A funny thing happened when the students got to play with it: They touched it, they tried it on, they liked its simplicity and ingenuity. They wanted the pattern. And by “wanted” I mean “suggested assertively that I get busy and make it happen, already”. I tried to argue that there were enough things I didn’t like about the vest that it wasn’t appropriate for public consumption. That while a useful example for class, it had elements which limit its knitability/wearability/appeal, and would have to be completely reworked. That its stash-dive yarn combo could not be reliably replicated by knitters.

My protestations were dismissed.

After a few repetitions of this exercise, I understood that resistance is futile. Like everything in knitting, it only hurts worse if you struggle. I pledged to rework the whole design, not just as a canvas for techniques, but as a carefully crafted and sized garment. One that would be both fun to knit and beautiful to wear. In short, one that is worthy of my knitters.

But the yarn problem remained: How could I replicate the strange and unusual color combination? What yarnmaker would sign up for such folly?

Enter the lovely and talented Kerry Graber of Jorstad Creek. Without trepidation, she took my little vest to her studio and worked all manner of magic. She chose the perfect base, and waved her wand over simmering cauldrons of color until she manifested this:

Did you ever? Me neither. Stunning doesn’t begin to describe it.

Once I had these gorgeous jewels in hand, I set about reworking the design. Stay tuned to see the process of how I reverse-engineered my creation for you, Gentle Readers. I think you’ll enjoy the ride.

Unventing Martin Storey's Roan

In Rowan 56, designer Martin Storey presents the beautful "Roan", with as lovely a charted colorwork pattern as ever I have seen:

Photo by Peter Christian Christiansen

So lovely is Roan that knitters everywhere immediately embraced it, including our own Ginny G.  But a quick perusal of the projects on Ravelry reveals the caveats of other knitters:  

1.  It's knit back and forth in rows, rather than circularly

2.  It's *oddly* shaped.  The schematic looks something like this:

Challenge 1:  Knitting Flat.  I have no idea why our knitting friends in England insist on working traditional stranded colorwork back and forth, in rows.  This piece is even referred to as "Fair Isle" by the designer, though I doubt if any traditional knitters on Fair or anywhere in Shetland would claim this as their own.  And that's not because the style is modern, though it is.  It's because knitting this in 5 flat pieces and then seaming them together would be absolutely miserable. True Fair Isle knitting is worked circularly, by definition.

Challenge 2:  Shaping.  I suspect that Roan's silhouette is influenced by the Japanese Kimono, with its square drop-shoulder sleeves and continuous neck opening.  But there's just one little problem:  The shape of this piece doesn't allow us anywhere to put our necks.  I've read the directions and checked them twice, and the pattern clearly states that the two front rectangles should meet at the center of the back.  Which means there's no notch for the wearer's neck. The fronts, correspondingly, have to hike up at the center,  (see photo above: "hold the bucket up higher, honey!") Anatomically speaking, this shape can't properly fit a body.

This is the shape I would make, if I were to knit Roan. The chart and stitch counts will still work perfectly, with just a couple of small changes. I've imagined a few things that would make it friendlier to wear, and much more fun to knit:

The first issue I would address is the lack of back neckline.  The design would still look as it was intended, but fit better, with the simple execution of some decreases, adjacent to the top of the front opening. I'd calculate the math something like this:

I'd also taper the sleeves slightly at the cuff, just because I find true Kimono sleeves to be uncomfortably sloppy.  To do that, I'd draw a diagonal line on the chart from the cuff to the sleeve top, lopping off about 20% of the total sleeve sts at the cuff edges, like this:

Then I would knit two tubes.  That's it.  They would look like this:

The purple lines indicate where the vertical cuts happen, and the wee hearts represent evenly-spaced increases and decreases.  See how those neckline decreases cause my body tube to deform a little (get smaller) at the top?  It will lay flat once the center front cut is made.  

Alternatively, I could just knit a perfect cylinder for the body tube and cut out a narrow triangle from the front neckline: no math or decrease spacing required!

Important: Notice I have not indicated any special cutting area for the armholes? That's because I'd want to make the sleeves first, separate them, and sew their underarm seams. Then, and only then, would I cut some slashes into the sides of the body tube that are the exact measurement of the finished sleeve tops.  Never try to knit sleeve tops that fit openings - it's too hard. Cut openings to fit sleeve tops.  It's easy. For a tutorial on conjoined sleeves, CLICK HERE and HERE

Here are where the cut edges end up:

And that's all there is to it.  The stitch counts in the edgings would change, but that's about it. I drew a little slope in my shoulders for these diagrams, But on further reflection, I wouldn't actually add that shaping.  A square drop shoulder is perfectly kimono-like, and much easier to work.

I believe that knitting which is truly beautiful has to be satisfying (both fun and skill-enhancing) to make, AND it has to make us feel beautiful when we wear it.  Without those two elements, we might as well just go shopping.

Whaddya think, Gentle Readers? Would you be more, or less willing to take a whack at Roan with these modifications?