
Queen Sleeves, Part Deux
When last we visited our Queen Bee's previously-conjoined sleeves, they were knitted, steeked, washed and blocked. Which really makes them just pieces. Today, I'm going to show you how I make them into finished sleeves. By the way, all of this information is also contained in my book, The New Stranded Colorwork, which I hope you will consider adding to your collection, if you haven't already.

I start by working from the wrong side. Beginning with the hem facing at the cuff, I butt the edges together, and sew them with matching yarn.

Then I turn the sleeve to the right side, and sew the outside of the cuff hem the same way; butting the edges together.

Next I change yarn colors (OCD much?). I decided to use a double strand here, because this yarn is very softly spun. A more firmly-twisted yarn would only require one strand. This is just a regular old mattress stitch. I work maybe six or eight stitches at a time, loosely, like the laces on a corset. Then I pull them up snugly. You can see that I'm matching the rows of knitting, one by one.

Here's the finished seam, from the outside. Notice how the pattern doesn't "match", because of the increases which shape the sleeve. This is the case to some degree with every handmade stranded colorwork sleeve, but it can't be seen when the garment is being worn. Observe, also, that the stitches at the top of the sleeve (brown) are all still live; held by a strand of cotton waste yarn. This will be important later.
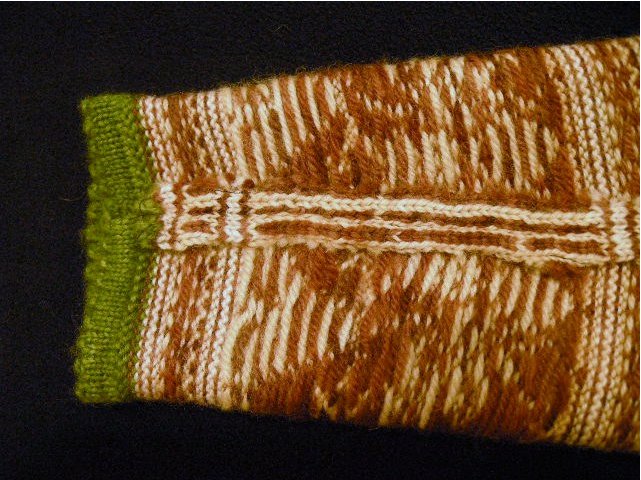
And here's what happens on the wrong side. The edges of the steek lie down flat, nicely away from each other. This hasn't been pressed or anything; it just happens all by itself when you sew the seam. I think it's so sexy when knitting behaves like that. I could leave the seam just like this, because the yarn I'm using here would full at the cut edges with washing and wearing. But in the case of yarn that won't do that (superwash, silk, etc.) or a knitter who doesn't think it's pretty enough (*cough-musthaveperfection-cough*), the next step is to cover the seam allowance.

Which I do, using a super-cute piece of bias tape (yes, the bias tape must be "super-cute", or the whole projet is ruined) that I found in the quilting department at my fabric store.

I sew it by hand, invisibly, from the wrong side, using a fine, sharp sewing needle and matching thread. The sewing needle never goes all the way through to the front side of the knitting in this step, like working a fine hem. I always use beeswax or thread conditioner when I do this, to keep the thread from knotting.

Remember all those live stitches still at the top of the sleeve? Now I finally deal with them. I put them onto a 16" circular needle, and pull out the waste yarn holder. Then I knit a facing. The facing is going to cover up the cut steek edges from the armhole slot, after the sleeve is sewn into the body. To give the sleeve enough ease for the wearer to raise her arms, the facing is worked with increases at the beginning and end of every round. See the little miter? I work six or seven rounds of facing, then bind off with a needle two sizes larger, to keep the edge stretchier. The facing is worked in reverse stockinette so that its knit side is showing once the sleeves are set. I don't like purling, so I turn the sleeve inside-out and knit the facing, rather than purling these rounds. And in case you are wondering, you can knit facings in any color you want, because it will never be seen from the right side. It would be a great place to hide a secret message, or your name and the date, if you wanted to knit (or embroider) them in. I told my children when they were small that if they saw contrasting colors on the insides of their sweaters, it was my secret code for telling them "I Love You".

And that's all there is to it. See the little gusset in the facing at the underarm? Now you can tell how that keeps the armpit seam from pulling out of the sweater.
Is this a lot of finishing? Some people think so. I really enjoy doing it, so I'm not bothered. But even if I were, I think I would still choose to do it this way. The knitting is SO much faster than with one-at-a-time sleeves that I still save time.
Tune in for the next phase, time when I relate how I fell prey to the Goddess of Gauge (who is totally a Mean Bitch), and what I did to save myself.


