The 21st Century Called; I Finally Picked Up

movie camera.jpg

Luddite that I am, I've finally succumbed to the pressure and made my first knitting video.  Many thanks, Gentle Readers, to those who have suggested that I do this.  I'm sorry it took me three years to come around.  Of course, the longer one postpones these things, the steeper the learning curve becomes.  My day:

7:30 - 9:00 AM:    Employ various household items to act as stands under the tripod holding my iphone (settle on upturned flowerpot); adjust lighting (change bulb in dining room chandelier); wait for dishwasher to finish running (ample ambient noise provided by scottish terriers slurping water loudly off-camera).

9:00 - 9:30 AM:    Video takes 1-5 recorded.  Hate them all.  Start over.

9:30 - 11:30 AM:   Import video.  Learn that Windows platform will in no way recognize iphone clips.  Download programs 1-3 for file conversion.  All fail.  Download program 4 and successfully upload video.  Realize it's 11:30 and I have 25 knitting kits to mail before the post office gets busy.

11:45 AM:            Remember that it's Christmas, and the post office is never not busy.

1:30 PM:              Begin teaching myself how to edit video

1:35 PM:              Retreat to kitchen for a snack.  Realize that learning to edit video is about as far from knitting as my avocation has ever taken me.  Remind myself that when your job is to play with string all day, there have to be some trade-offs in the fun department.

1:45 - 6:45 PM     Finally start to feel like I'm getting the hang of the video thing when Phillip announces that dinner is ready (thanks for throwing yourself on that grenade, Dear).

7:00 PM              Ask Lindsay what she's been doing up in her room.  "Making and trading videos online with my friends."  "Oh, really?  Videos?  Like, with a camera and everything?  When did you learn to do that?" I ask. "Oh, fourth grade, I think."

7:01 PM              Resolve to hire a 13-year-old Producer.

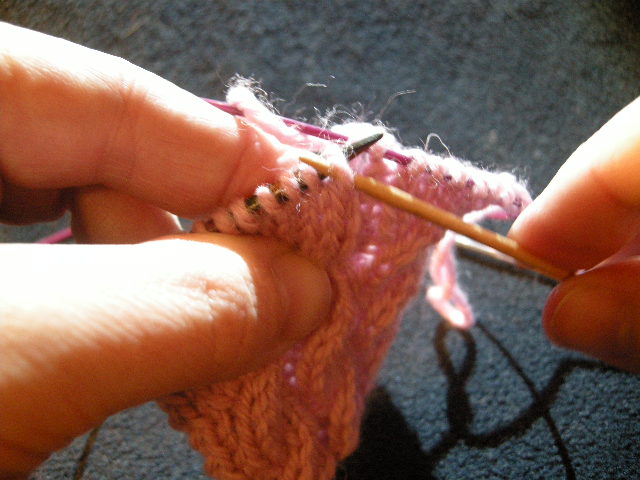
Ironic cruelties of the Universe notwithstanding, I did manage to get the thing online.  For those who are knitting the Wild Hare mittens, and for the merely curious, I present:  Knitting A Bobbled Cast On.  Enjoy!

Oh, and in case you're wondering, the Wild Hare knitters have raised over $700.00 for Judith Mackenzie's studio rebuilding effort.  Thank you all, sincerely.

Bangin' Buttonholes

My relentlessly fiddly pursuit of the sexiest cardigan placket EVER had me researching buttonholes yesterday.  I needed a small, but not-too-small one that looks tidy and holds firm.  Montse Stanley to the rescue.  And lest you think that I don't have any other knitting reference books, let me assure you that I do; I just usually start with this one, and it rarely lets me down.  The buttonhole I found here is, in a word, Perfect.  I can't believe I never bothered looking it up before, and I'm so excited about it I just had to show it to you.

Our beloved Montse has the eccentricity of speaking English, which, as we knitters sometimes discover, is not the same thing as speaking American.  Case in point:  On page 195 of my dog-eared copy, she entreats us to "K-b2tog".  Which abbreviation eluded translation for me completely.  I looked everywhere I could think for some explanation of that move, with no success (If you know what it means, please post a comment so I can sleep tonight).  My best guess is that she's telling us to knit two together through the back loops, but I wouldn't bet my cashmere on it.  I pressed on anyway, realizing that the working together of two stitches (through back loops or otherwise) wasn't really the salient point of the operation.  Assuming that we're supposed to somehow turn two stitches into one, I followed the rest of the instructions, and Presto!  Magnifico.  With my apologies to Montse and all other speakers of English, Here are my translated instructions for the "Large Eyelet Buttonhole": 

In this sample, I'm working in 1 x 1 rib, but this hole can be made in knitting of any pattern.  The operation happens over the course of three rows, but don't let that make you nervous; it's supremely easy.

Step 1  (On the Right Side) is to work up to the place you'd like to make a buttonhole, and work two stitches together.  In this case I worked an SSK, which caused a knit stitch to discretely cover its purl neighbor.  Next you make a DOUBLE YO, which amounts to simply wrapping the working yarn around the right needle twice.  Then you just finish the row as if nothing special were happening at all.  Remember: you can work any sort of decrease you like the look of (or remember how to do), and you can make the double YO on either side of it.  What matters is that you work two stitches together, and that the YO be doubled.

Step 2 happens on the Wrong Side.  You just work in pattern right up to the double YO and do to it whatever you would have done if it were a normal stitch.  In this case, it's a knit, so that's all I have to do.  Even though there are two wraps around the needle, it's still only one stitch, as you'll discover as soon as you work it - the extra wrap just falls off the needle, making a larger-than-usual stitch:

Step 3 is done on the Right Side, and this is where all the magic happens.  You know I'm a slave to sexy party tricks, and this one is a PIP!  

You just work in pattern right up to that big ol' sloppy stitch (can't miss it: it's the ugly one that's making your gums bleed).  Then you stick your needle through the hole and make the same stitch you would have if this were a normal row of knitting.  In my case, a purl.  Now take a deep breath and DROP the next stitch right off the needle.  Continue on in pattern to the end of the row.  The stitch you dropped is held in place by the one you worked THROUGH the hole.  I know.  I didn't believe it either, until I did it.  Nine Times:

All that's left after those three steps is to finish the placket, or whatever, and congratulate yourself on your immaculate buttonhole execution.  Neat as a pin, and twice as sharp.  And you even stuck the landing.
 

Now go tell your friends.  This one's too good not to share.
 

How to Fix a Mis-Crossed Cable

Some of you very helpfully pointed out after my last post that not everyone is familiar with the technique for repairing a mistake in knitting without ripping out all the stitches back to the error.  This is referred to as "laddering down", "laddering back", "dropping down", or, in some cases "Holy S@#*! Now what do I do?" 

Herewith, A Tutorial:

Let's imagine that you are knitting a some swell cables that are all supposed to cross in the same direction (in this case, to the right).  Let's imagine that you are watching a movie with subtitles, or lots of action, or a particularly dreamy star *Cough-Game-of-Thrones-Cough*, and you get a little distracted.  And then let's imagine that during a commercial, you proudly spread out your knitting to admire it, only to realize that one of those wee cables has managed to twist in the wrong direction (in this case, to the left).  Or maybe it wasn't even a cable, but a split stitch, or a k2tog that should have been an SSK, or some other horror that Shall Not be Named.  This technique will allow you to fix whatever went wrong a while back in your knitting, without tearing out all the perfectly good knitting around (and since) the mistake.

If you're not already using one, switch to a circular needle with a nice long cable before you start.
 

First, knit up to the problem stitch (or group of stitches, if they cross/travel over each other) in your established pattern as if nothing had gone wrong, then stop, leaving your working yarn hanging.  In this case, my miss-crossed cable has 4 sts, so that's how many I'm going to ladder down.
 

3.JPG

Slip the live sts off the needle.  Take a deep breath.

4.JPG

Pull the needles forward on either side of your working area so that the stitches you aren't laddering will stay safely suspended on their cable (now they can't accidentally drop off the points of the main needles).

5.JPG

Using the point of another needle (I like short, small-diameter DPNs best for this job), gently pull out the live sts, one row at a time, all the way back to the mistake.

When you reach the error, pull it out, and then stop.  Exhale.  You're halfway done.
 

Pick up the live sts on your little DPN.  Don't worry if they twist the wrong way, just get them on the needle.  Once you have them all picked up, re-orient each st so it presents properly (not twisted) for reknitting.

8.JPG

From this point forward, you will reknit each "mini-row" (the laddered sts in each row) using a second DPN and following your pattern, one row at a time.

10.JPG

Use the loose yarn from each ladder rung (frogged sts) to rework each mini-row.  Make sure to check carefully at the beginning of every mini-row that you are using its proper ladder rung, without skipping any.

11.JPG

Here I'm using a cable needle to cross the cable properly on the mini-row where it should have happened the first time.  Not pictured: My expression of smugness and relief.

And now the cable is crossing as it should.  Above you can see the ladder rungs still waiting to be reknit.  Notice how much slack is in each one?  That's what makes this party trick possible.  Thanks, Knitting!

14.JPG

And now we're back to the top of the work again.  Unless you tell them, no one will ever know you jacked it up the first time, and your secret is safe with me.

Carefully slip the reknit sts from your DPN back onto the Left main needle.

Continue in pattern with your working yarn, as if the detour had never happened.  

Sleep soundly, knowing you are the Rock Star you always suspected yourself to be.