Cutthroat

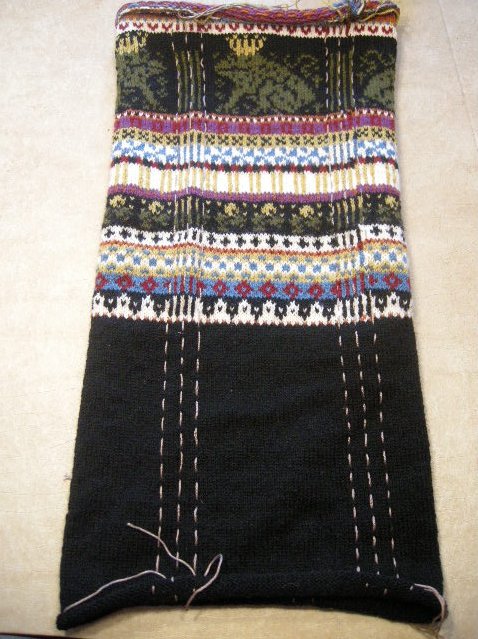
As I was working on the Frog Prince neck shaping, I realized that my dining room table had become kind of an interesting tableau: A snapshot of how I work.  Clockwise from upper left: My trusty gridlined Moleskine design notebook, which is never more than a foot away from me, even when I sleep (TMI?); Knitting chart, underneath workbag with stitch marker box (In which I would also keep cable needles, if I could ever find any); Pile of unperused mail (not germane to project - just part of the landscape); Actual work in progress; and blue painter's tape, without which I probably could not make sweaters (more about that in my book).

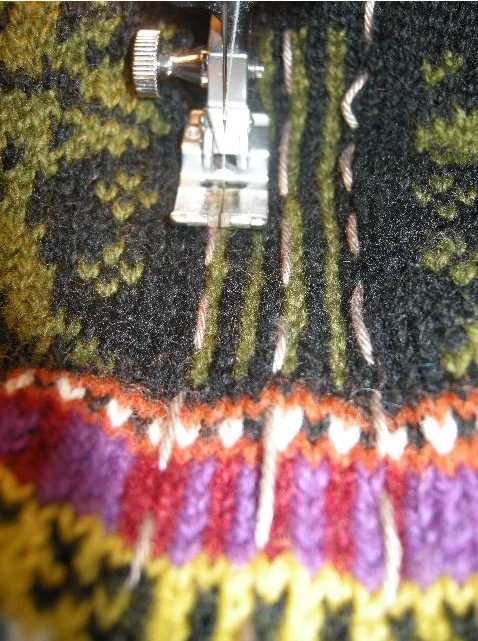
More waste yarn marking lines, adjacent to which I will machine-stitch the neck curve outline.  Notice that it's not exactly a curve at this point - that little corner formed by the intersection of the marking yarn will round out on its own.  More Pure Magic.

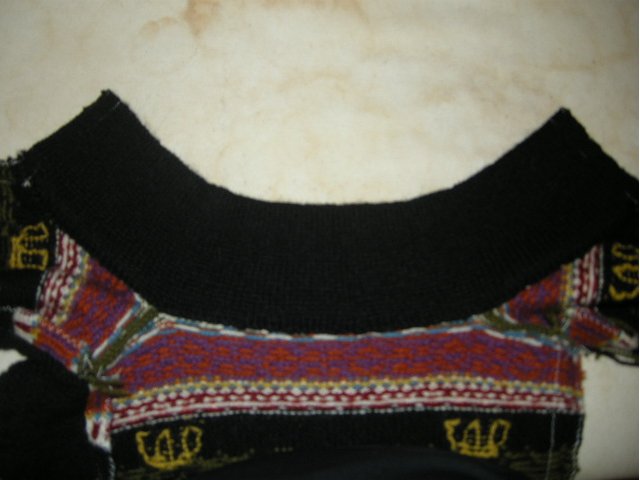
Here is the actual neckline stitching, with the marking lines removed.  You can also see that the original live stitches from the top of the knitted tube are all just held on spare yarn.  The live stitches on the left will become the shoulder seam.  Those on the right...well, see below:

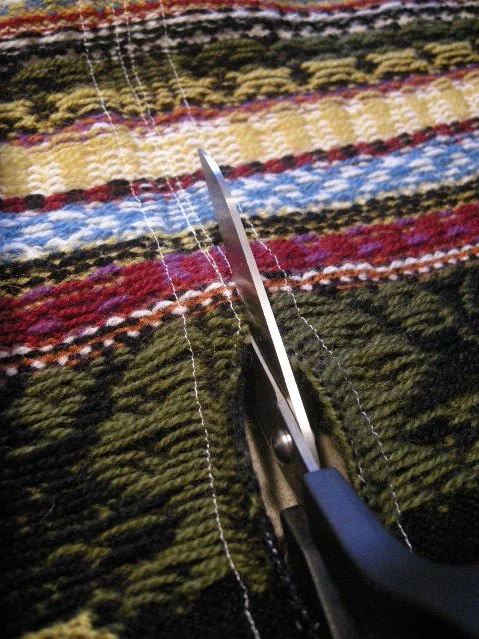
Sacrificed for the greater good.  Here I have mercilessly hacked off a section of perfectly sound knitting, in order to make room for the wearer's head and neck.  Without doing this, there would be no neckline, making for extremely awkward wear.  Knitting is not for weenies.  

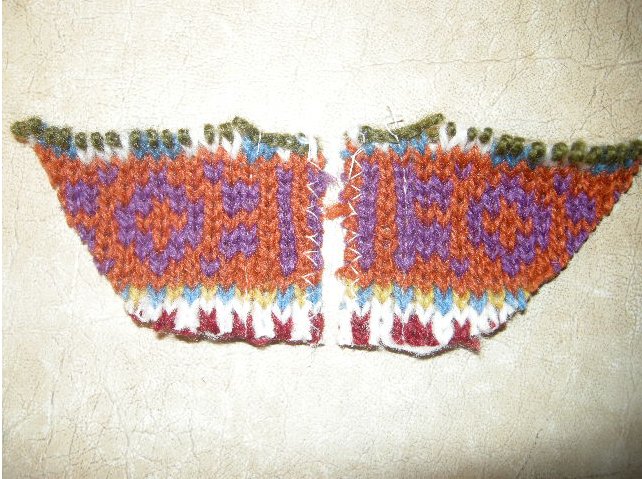
Lest you think me too callus for ruthlessly discarding pieces of my hard won knitting, I wanted to show you this:  The actual amount of wasted knitting = about 3 square inches.  Not a bad trade for never purling back on the wrong side of the knitting.  Have I mentioned it's Magic?  Pure Magic.
 

Speaking Mandarin (A Standing Collar is Born)

The Frog Prince progresses at a steady clip, probably because knowing that I need to stay ahead of the next blog post has added a whole new dimension of accountablilty to the process.  We who would otherwise lag behind, thank you.  In case I haven't explained it, my Cunning Plan is to make the Frog Prince available to you before my book tour begins, which is either optomistic or delusional; only time will tell.

In order to make a standing collar curve neatly around a human neck, it has to be made in the shape of an arc, like a rainbow, rather than a plain rectangle.  We could accomplish this shaping with decreases, but not without disrupting the stitch count and making the colorwork aspect UN-fun.  Instead, we'll cheat, capitalizing on the incredible properties of gauge, and the remarkable ability of wool to be shaped with steam.  For once, we are going to use these powers for good.  Thus Spoke The Queen.

After joining the shoulder seams with a three-needle bindoff, I pick up some stitches around the neckline, including those previously held on waste yarn across the back.  This step is the final disposition of all those live stitches that were held off at the top of the original knitted tube.  They are all neatly accounted for now.  Tricksy, no?

I place a couple of markers and create a new steek for the collar (we haven't come this far just to start purling, now!). I use a size 3 needle for the first 10 rows of the collar, a size 2 for the next ten, and a size 1 for the last 10.  Presto: an arc-shaped mandarin with no stitch count changes.
Then I knit a 30-row facing (the black part) for the collar, reversing the needle size changes every 10 rows, and bind it off.  Here I have marked the steek, which will be machine-stitched and cut, just as before.  I will spare you photos of that carnage, but do note that this step marks the last of all the steeking and cutting in the Frog Prince.  The Crowd Goes Wild.

After cutting the collar steek, I steam-block the collar to make the facing quit rolling.  Then I pin and stitch it over the cut neckline curve edges.  That is the main reason to face the collar: I want those cut edges covered.  I could alternatively do this with bias tape, but I like the extra body provided by the full facing.  A standing collar must, after all, stand, and two layers of fabric are better than one for that.

Here is the finished arc-shaped collar, complete with hidden neck curve edges.  It both fits a human neck and stands up, thanks to the combined powers of gauge and malleability.

In case you are wondering, no, it wasn't strictly necessary to make the collar at this stage of construction.  I could have waited until the very end just as well.  However, I decided that I would rather work the collar before the sweater had the added weight of sleeves.  Since part of the process requires swinging the whole garment around in little circles on size 1 needles, I elected to perform that feat before the sleeves were added.  YMMV.  

Join me for the next installment, in which sleeves grow sideways, cats and dogs live together, and things get a little bit weird. er.  
 

Steeky Fingers

First let me thank you, Gentle Readers, for weighing in with your opinions on seeing or not seeing the blood-and-guts process of making the Frog Prince.  It seems that most of you would like to see me break the eggs, in the hopes that I get an omelet.  It is rare that I can show you all the steps it takes to get a finished design.  Most of the time, my projects have been sold to a yarn company or a publisher before they are even born, and those people cleverly require me to keep my process under wraps until they are ready.  This project, however, I have saved especially for you.  Won't you join me on my Odyssey, and feel free to post questions as we go?

Here we rejoin the Frog Prince panel-tube in progress.  You can see my cotton yarn markers for the steek stitching and cutting lines. These are to help me see exactly where to stitch, and then cut the steeks.  Traditional construction would have only one vertical steek (in the center front of a cardigan), but since the Frog Prince is special (Weird?), it begins with a tube made of three conjoined panels, and three steeks.

Here I am machine-stitching the first of 4 vertical lines made on each of the three steeks.  The machine-stitches go right down the valley between knitted stitch columns, securing the steek.  Pure Magic.  Steeks can be stitched in several different ways, each with advantages for various applications.  I chose to machine these, since I will be handling the raw edges quite a bit before finishing them.  A crocheted edge would be equally durable, but takes (me) a lot longer and adds more bulk than I need since it will ultimately be covered.

Warning: Yarn Carnage!  Sensitive viewers may need to skip this shot.  Braver souls will note that the 4 vertical stitching lines are clearly visible from the wrong side of the work.  I usually cut steeks from the back for this reason.  Any advantage you can get when scissoring a sweater, yes?  I slice right between the middle two stitching lines with extremely sharp dressmakers shears.  By the way, even though I have performed this maneuver many times, I still hold my breath.

Eggs broken, Omelet Begun.  Here are the three Frog Prince panels, no longer conjoined.  I wash and block them just as I would any other sweater parts.

For those who have asked, this yarn is Rauma Finullgarn (translation = Fine Wool Yarn) from Nordic Fiber Arts, where you will eventually be able to purchase the Frog Prince Kit.  This yarn is the Real Deal, as far as Scandinavian knitting goes: Gorgeous, traditional colors, perfect stranding behavior, and just sticky enough to steek like a champ.  And we wouldn't expect any less from the descendants of the geniuses who made up stranded colorwork, now would we?

This is two-ply yarn, working up at a guage of 7sts/in on a US size 3 needle, in case you are wondering.

Join me next time, in which I plan to slash a throat.  Or shape a neckline.  Whichever.