How to Fix a Mis-Crossed Cable

Some of you very helpfully pointed out after my last post that not everyone is familiar with the technique for repairing a mistake in knitting without ripping out all the stitches back to the error.  This is referred to as "laddering down", "laddering back", "dropping down", or, in some cases "Holy S@#*! Now what do I do?" 

Herewith, A Tutorial:

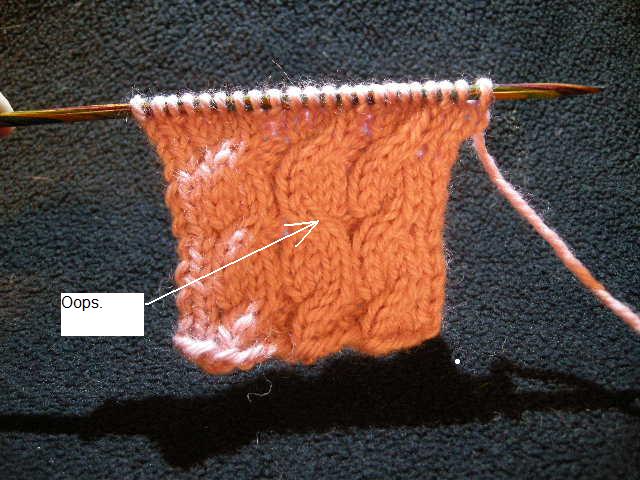
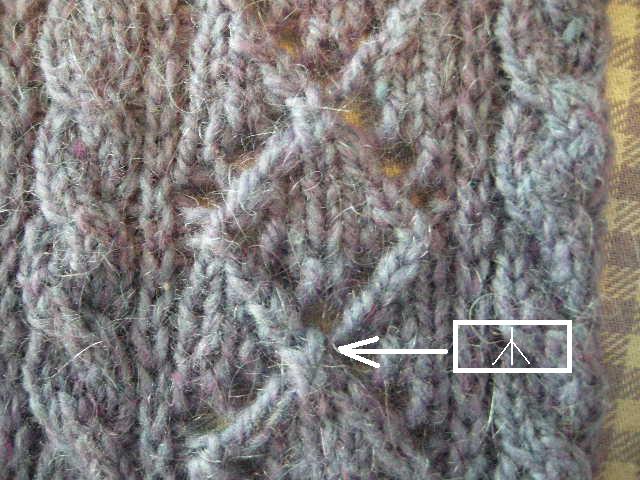
Let's imagine that you are knitting a some swell cables that are all supposed to cross in the same direction (in this case, to the right).  Let's imagine that you are watching a movie with subtitles, or lots of action, or a particularly dreamy star *Cough-Game-of-Thrones-Cough*, and you get a little distracted.  And then let's imagine that during a commercial, you proudly spread out your knitting to admire it, only to realize that one of those wee cables has managed to twist in the wrong direction (in this case, to the left).  Or maybe it wasn't even a cable, but a split stitch, or a k2tog that should have been an SSK, or some other horror that Shall Not be Named.  This technique will allow you to fix whatever went wrong a while back in your knitting, without tearing out all the perfectly good knitting around (and since) the mistake.

If you're not already using one, switch to a circular needle with a nice long cable before you start.
 

First, knit up to the problem stitch (or group of stitches, if they cross/travel over each other) in your established pattern as if nothing had gone wrong, then stop, leaving your working yarn hanging.  In this case, my miss-crossed cable has 4 sts, so that's how many I'm going to ladder down.
 

3.JPG

Slip the live sts off the needle.  Take a deep breath.

4.JPG

Pull the needles forward on either side of your working area so that the stitches you aren't laddering will stay safely suspended on their cable (now they can't accidentally drop off the points of the main needles).

5.JPG

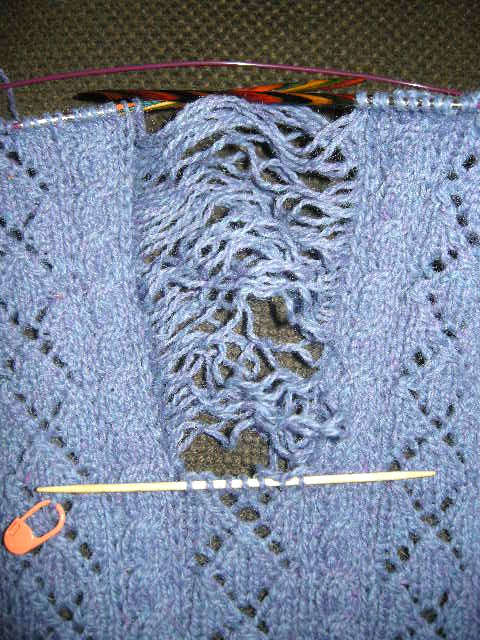
Using the point of another needle (I like short, small-diameter DPNs best for this job), gently pull out the live sts, one row at a time, all the way back to the mistake.

When you reach the error, pull it out, and then stop.  Exhale.  You're halfway done.
 

Pick up the live sts on your little DPN.  Don't worry if they twist the wrong way, just get them on the needle.  Once you have them all picked up, re-orient each st so it presents properly (not twisted) for reknitting.

8.JPG

From this point forward, you will reknit each "mini-row" (the laddered sts in each row) using a second DPN and following your pattern, one row at a time.

10.JPG

Use the loose yarn from each ladder rung (frogged sts) to rework each mini-row.  Make sure to check carefully at the beginning of every mini-row that you are using its proper ladder rung, without skipping any.

11.JPG

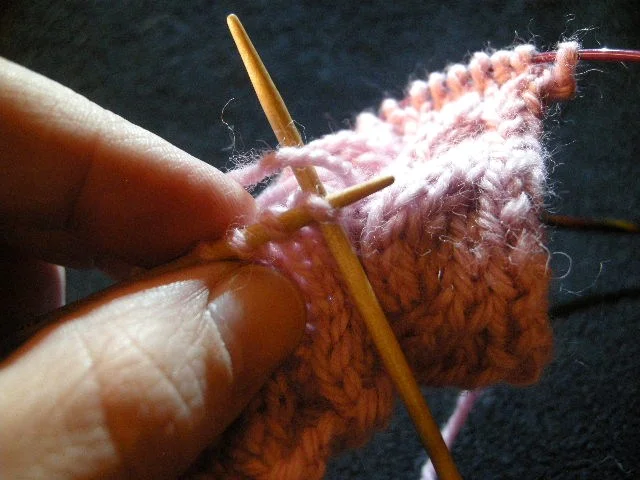
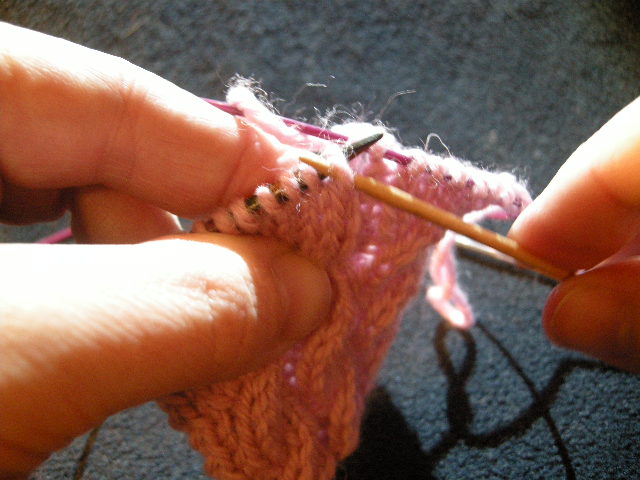
Here I'm using a cable needle to cross the cable properly on the mini-row where it should have happened the first time.  Not pictured: My expression of smugness and relief.

And now the cable is crossing as it should.  Above you can see the ladder rungs still waiting to be reknit.  Notice how much slack is in each one?  That's what makes this party trick possible.  Thanks, Knitting!

14.JPG

And now we're back to the top of the work again.  Unless you tell them, no one will ever know you jacked it up the first time, and your secret is safe with me.

Carefully slip the reknit sts from your DPN back onto the Left main needle.

Continue in pattern with your working yarn, as if the detour had never happened.  

Sleep soundly, knowing you are the Rock Star you always suspected yourself to be.

Omelette = Broken Eggs

So there I was, happily knitting on the back of the Desert Island cardigan, when I was seized by a bout of OCD  Imperfection Intolerance.  I was about 6 pattern repeats up the back when I realized that I simply could not abide the centered double decrease called for in the chart I was using.  I had done it as charted 6 times in my swatch.  I had done it as charted 30 times in my sweater back.  And that was it; I couldn't do it that way any more.  I realized that I wanted it how I wanted it, and now there was no choice but to ladder back.  30 times.

Here is the diamond motif, as charted, with a classic centered double decrease:

See how the stitch from the top of the lower diamond kind of squirms itself up and over into the next diamond?  Like it wasn't even invited?  Like it just sort of stopped by and then decided to stay for the party?  For reasons only my therapist can tell you, I simply couldn't have it.  What was wanted, I realized, (30 repeats later) was this:
 

This is your trusty garden-variety SL1, k2tog, PSSO maneuver.  See how he keeps the riffraff from the diamond downstairs from sneaking up into the festivities above?  Cordoned Off, my friends.  That is a diamond who has itself sorted, and once I thought of it, no other diamond would do.

Once I found myself unable to deny my need for disciplined diamonds, I faced the classic conundrum:  Ladder back or frog it?  For some reason, it felt like a real frog-out would be admitting defeat in some way.  After all, the other cables and the side panels were all behaving themselves perfectly well, so why should they be mercilessly ripped apart?  No, only a ladder-down seemed fair, which I (maniacally) deftly managed while watching a documentary about sushi (Note to self: subtitles are no friend of laddered cables). 

After that was done, I smugly forged ahead, finishing the back almost completely before I noticed one little diamond up near the shoulder.  It had somehow managed to invite one of those ill-behaved center double decreases over, right under my militant eye.  Nothing for it but to ladder back again.  At least this time (I told myself), there was only one diamond to fix.  And hey, it was only 3 repeats ago.  These things are sent to try us.

By this time I had pressed an uncommon degree of service out of my Brittany glove needles (super-sexy wee DPNs that are only 5" long)  They were perfect for the job because they were so short I could easily work the 7-stitches of each repair row without any undue tangling or snagging.  Even if you don't knit gloves, I highly recommend you get a set of these little cuties, just for such emergencies.  But don't treat them unfairly, like I evidently did:

They really aren't much more than cocktail picks, after all.  Alas, poor DPNs, I'm sorry.  Your sacrifice was not in vain, though.  With your help, I have at last achieved Sweater Back:
 

And my new cast on book has arrived, just in time for me to see if there isn't some better option available than the one I picked for the back.  And no, in case you're wondering: If I find one, I will not be laddering back to the cast on to fix it.  That would just be anal.
 

Make A Wish

My Desert Island exercise is progressing.  Here's the back, about 2" shy of the beginning of the armhole shaping.  

As I've worked, I've been making a wish list of design elements I want to include.  Some of them conflict, some cancel each other out, and some, I have discovered are impossible, due to holes in my knowledge base.  Here's the list (as of this moment, and in no particular order):

Cables and lace together
Easily memorized pattern=fun to knit
Wide ribbing bands
Cables that flow all the way into the ribbing (ala Kathy Zimmerman, Crown Princess of Cohesive Cables)
Tubular or other sexy cast on, with matching bind off
Cabled button placket, with buttons centered on each cable
Symmetrically opposed cable twists throughout
Square neckline
Gathered sleeve caps
Cables that match at shoulders
Shoulder straps
Heavily textured sleeves
Plain stockinette sleeves

As you can see, there are enough checks and balances here to establish a government.  Some things I'm going to have to let go of, and others I'm going to have to stand on my head to achieve.

The first compromise was the cast on.  I've been telling myself for years that I have a pretty good knowledge of different cast ons.  But it turns out that I really just have a couple of fun party tricks that I rely on heavily.  Case in point: I always use a tubular cast on and matching bind off for 1x1 rib.  It's so pretty, and so stretchy and perfect.  But in order to make my cables flow from the rib into the design, I had to place them precisely within the rib, ruining the tubular cast on.  There are 7 sts between each cable, and a 1x1 cast on relies on even numbers.  So I reluctantly settled on a boring old cable cast on, which I just know is not the best I could have done. I looked through all my reference books to see if there was a better option, only to find that I really don't have a cast on/bind off book in my collection.  Yet.  I ordered THIS ONE in hopes of expanding my repertoire.  I've promised myself that if I learn a better way before beginning the fronts, I'll do them differently, and not let it bother me that it won't match.  Because I can totally handle that.  Probably.

Now you tell me:  What dreamy design elements are in YOUR Desert Island sweater?  Do you know how to execute them?