Since You Asked

Did ya miss me?  I missed you!  I've been chasing my own tail for a bit, between classes that I'm teaching, classes that I'm planning, a book I'm finishing up, and boring stuff like eating and sleeping.

Lots of you have been asking me when I'm going to re-publish my mom's favorite knitting pattern:

This is mostly due to the fact that I hardly ever take it off, prompting more inquiries every time I meet knitters.  There is just something about the way this thing fits, and the way it goes with everything (in spite of its uber-pink hue); I wish I had one in every color.  And even non-knitters ask me about it.  Here it is (actually still damp in this photo, because I had to take it off long enough to give it a well-deserved bath):

As I said before, this version was only meant to be the prototype.  I grabbed the first yarn from my stash that I had a sweater's-worth of (Paton's Classic Wool Worsted, in Magenta, if you're wondering) and tore through the pattern almost exactly as it was originally written.  Which took me like, a week, shoehorned in between other projects, BTW. 

The only changes I made were to continue the cables all the way down the sides (my mom's totally sexy hack), and to knit the sleeves in the round rather than flat.  Oh, and I worked the yarn at a firmer gauge (5.5 sts to the inch), rather than the 4.5 called for in the pattern.  Result?  prototype cardi worn at zero ease on me.  I thought I would hate that fit, and promised to give the thing to my niece, who is wee.  But I don't hate it even a little bit, in spite of the fact that I know it looks so much cuter on her.  Doesn't hurt that she's a 19-year-old blue-eyed coed, of course.  Now that I think about it, it sucks not a little that the universe is awarding her both the figure of a gorgeous 19-YO, AND the pink sweater, but that's probably just my 40-something year old sour (noticably shrivelling)  grapes talking.  A promise is a promise, so I'm preparing myself emotionally to let pinky go, and making another, more mature test knit for myself.

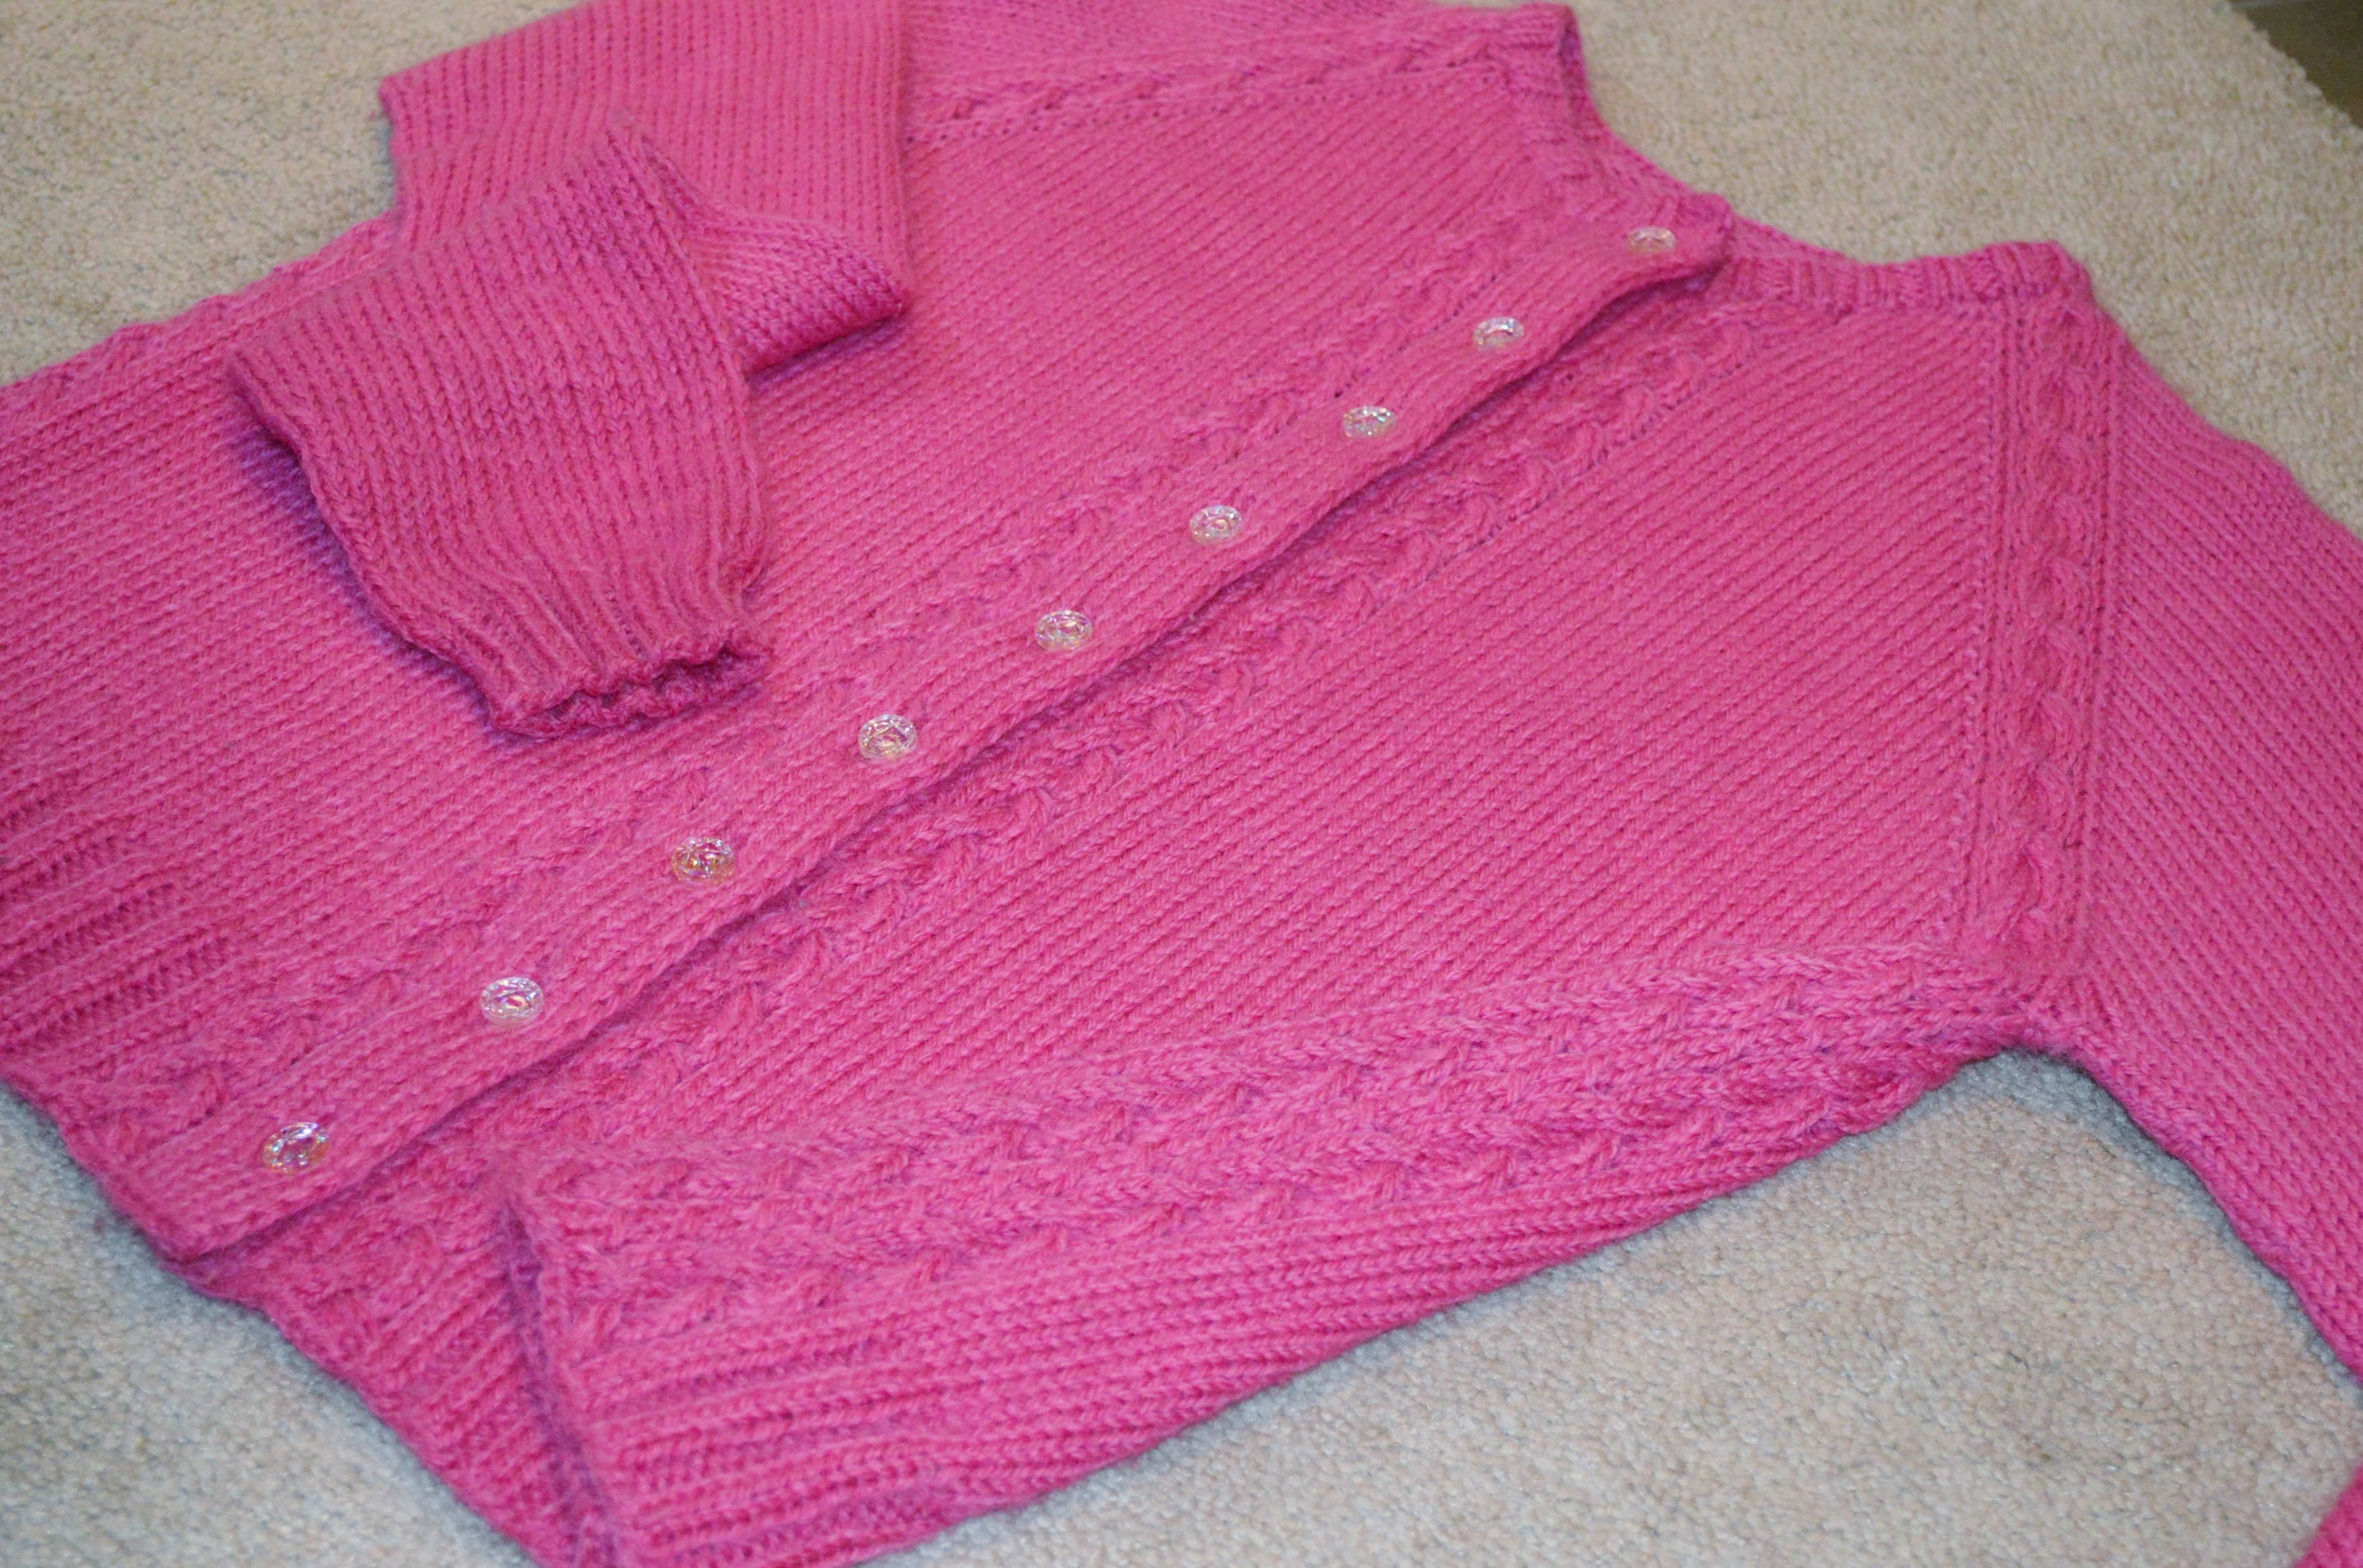
Here's a better shot of those side cables.  They are at once delicate, proportionate, interesting and slimming.  Nice work, Mom.  And I know she'd be proud of me for giving it up to Sarah, who totally deserves it, and whom I hope will remember this when she has to decide what sort of old-age home to park me in.

Here's the yarn for version 2.0:

Since 4.JPG

Unimaginably dreamy much?  Targhee Worsted from BMFA, in "A Hazy Shade of Blue". (BUY HERE)  I almost never knit with blue, and I have no idea why not.  This is a gorgeous, complicated blue that is begging to be worn with a kilt.  Or ratty jeans.  Or thrown on over striped pajamas to walk the dogs.  Pretty sure there's no place this color does not belong.  Oh, and did I mention TARGHEE??? Somebody stop me.  It's so sproingy, and full of life and air and fluff and twist!  And get a load of the yardage on that beast!  2 skeins should totally cover me (a steal at only $32 each!).

Refinements I'm planning for 2.0 include:
1.      I'm going to attempt to knit at the gauge suggested by the original designer, whomever she was.  In spite of not loving the more relaxed 4.5 sts/inch, there are a couple of good reasons for me to get over myself and try:  A. The neckline is very high and tight (60's Sweater Girl style) to begin with, and ratcheting down the gauge does nothing to help that situation.  B. Likewise, the sleeves were sized to be worn solo, not layered over other tops like I do.  A little more real estate is needed so the cuff bind-off doesn't become a tourniquet.

2.      Working at a looser gauge is not going to be enough to get that neckline sorted, by itself.  My professional opinion is that it would look more modern if it were, say, an inch wider.  More stitches, please.  Eewww; Math.  Not to worry, I'm a trained professional on a closed course.  What could possibly go wrong? 

3.      Buttonholes: because I was playing fast and loose (tight?) with the gauge on the first version, I elected not to knit the buttonholes, in fear that they wouldn't land in the right places.  Instead I chose to machine-stitch them in at the end.  I actually like the polished, dressmaker quality of the thread buttonholes, but they did stretch out, in spite of my having used stabilizer and cutting them very conservatively.  No big deal to stitch their ends closed more tightly, but I would like to have avoided that.  I'm thinking I might do something with a ribbon to shore up the placket...Your thoughts, Gentle Readers?

4.      Many of you have suggested that a new name is in order for this design, with which I totally agree.  In honor of my mom, I'm re-naming it "Jane Wolff Scott". 

Stay Tuned!

Royals

We've been short one bathroom around here, since the Incredible Exploding Toilet Incident.  The situation has been Super Dreamy.  Seriously; there is nothing like four semi-adults battling for bathroom supremacy.  All the time.  I thought I knew my family pretty intimately, but it turns out I was wrong.  Turns out our toilette strategies differ greatly.  Some of us are in and out like a precision drill, taking care of business with speed and efficiency.  Others, however, prefer a more leisurely pace, substituting, it would seem, the Loo for the Library.  I worry that those in the first category have been secretly plotting the demise of those in the second.  Don't ask me how I know.

There are other privileged First World families who share one throne all the time, and let me tell you, my respect for their daily struggle has really skyrocketed.  But I digress.  Remember this?  

Everything 2.JPG

It's the Before photo of Lindsay and Campbell's gutted bathroom, post-water damage.

Blessedly, our homeowner's insurance provided new drywall, flooring, and a pretty new vanity.  Contractors even repainted for us, which was a huge bonus, because I am up to my lips in knitting at the moment, with no time for such things.  What insurance didn't pay for, sadly, was an actual new toilet, or a plumber to install one.  We scratched up enough scratch (Thank you, Ravelry Pattern Sales!) to buy a new Seat of Power, and settled in to wait until the funds accumulated to hire the plumber.

And you know how good I am at waiting.

After a truly interminable period of looking at the big toilet box and longing to see the thing installed (almost one whole day), the Huff Ladies hatched a Cunning Plan.  Lindsay and I decided we should look into just how difficult toilet installation is.  I mean, indoor plumbing was invented by (no disrespect), GUYS, right?  How complicated could it be? 

Would you believe it?  Our new Potty has its own Movie!  You have to watch this.  I find it hilarious, which probably tells you more about me than about the product:

CLICK HERE

And there's another movie, too, which explains step by step how to install one of these!

Armed with an ipad, a YouTube video, and the strong desire to git-er-done, Lindsay and I (Wo)manned up and did the deed:

Royals 2.jpg

We are the Tzarinas of Toilet.  The Princesses of Piddle.  The Dutchesses of Dooky.  The Soverigns of, well, you get the idea. 

Here's another After photo:

And lo, there was peace throughout the land.  It's Good to be Queens.
 

Scuff Happens

What did you learn this week?  I learned that there are slippers that have to have cardboard inside of them, and that it's not a bad thing.  I learned that some edgings have to look sexy from both sides of the work, but it can be done.  And I learned that even if you successfully avoid learning how to make wrong-side right and left-leaning decreases by not knitting lace, you still may not be safe from them.  If you invent something like this, for example:

Yep, on Monday, I did not know how to knit scuff slippers.  It's Friday, and now I do.  Crazy! 

First of all, if you go looking around for patterns of scuff slippers, the first thing you will notice is that they are all for felted slippers.  Nothing wrong with that, you understand, but because mine were going to be stranded colorwork, I didn't want to felt them.  Which means I had to devise some method of stiffening the soles that could hide underneath a leather layer, still be a little bit flexible, not cost too much, and be easy for knitters to get.  Oh, and extra stiff-leather soles are out because most of us don't have the leatherworking tools needed to shape and sew them.  Bother.

Enter the very smart Katie Starzman, whose book:

Scuff 2.jpg

reveals her secret:  Chipboard!  It's that stiff brown cardboard you can get at the craft store in sheets.  It's easily cut with scissors, inexpensive, and easy to find, and works like a charm.  Thanks, Katie!

So what about those wrong-side increases?  Well, it's my own fault, as usual:  When I design, I imagine the way I want the finished project to look, and then amass or invent the actual skills to get myself there.  Which is a lot like putting a weathervane up in the air and then trying to build a house underneath it, but there you go; I'm not much for Order of Operations.

I wanted pointy points on the instep, and I wanted them to be decreased, not increased.  OK, to decrease them, the slipper can to start out with a provisional CO, from which you pick up and knit the pointy points at the end. Done.  But the rate of decreases worked on the RS is just not steep enough.  So?  Make decreases every row (rather than every other), which means some of them (about half, as it  turns out) will be happening on the WS.  Here's the ridiculous part Mary-ish part: Rather than take the time to actually learn the new skill I needed, I just made one up.  On the WS row, every time I needed a decrease, I would turn the work around to the RS, mirror-knit it (cough*thanks Mary B* cough), turn the work around again and proceed.  I can tell that it worked fine, because the decreases are all leaning in the proper directions.

Only when it came time to write the pattern for YOU, Gentle Knitters, did I go looking and learn that you can actually perform those maneuvers quite easily from the WS (as God intended), and they even have their own proper names!  CLICK HERE for excellent knowledge from the learned and wise Sandi R on these sexy party tricks.  And Lace Knitters who are smarter than me and have been forever, thank you for so graciously witholding your derision.  Feel free to smirk, though.

And last of all, that edging.  I knew I wanted it to be applied knitted cord, but it wasn't until I got to the place where the edge of the slipper switches from being the "right side" to being the "wrong side" (like the edge of a jacket lapel) that I realized what a truly useful thing knitted cord edging is.  It looks equally tidy from either side.  Elizabeth Zimmermann has been trying to tell me this for years, but I didn't receive her full message until now.  Thanks, Knitting!

So that's three things I learned in just one week.  I have to admit I'm feeling a little bit smug.  Which is good, because a lot of other experiences I had this week were (heinous) less elucidating.