Even Though I'm Right, I'm Wrong

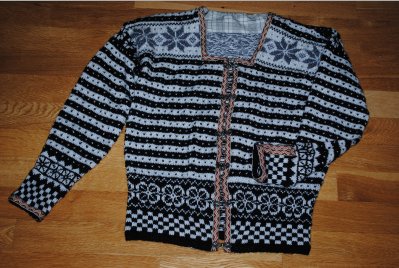
I paid really close attention to the antique Fana cardigan in this photo:

My favorite thing about it? ANATOMICAL CUFFS.  Look closely: The cuff openings will fall at the wristbones, not on the undersides of the sleeves, where the rounds would usually begin and the increases happen.  This would require some deft maneuvering to replicate, and you know that I do love me some sexy sweater construction.  But how to get the openings rotated a quarter of the way around each wrist?  
 

Option 1:  Knit the sleeves normally, one at a time. Then cut the opening where you want it and bind its edges with ribbon.

Option 2:  Knit the cuffs together with steeks in between.  Separate the cuffs, then place them each on needles with the openings oriented as needed, but start each subsequent round a quarter-cuff away.  Repeat for second sleeve, in reverse.

Option 3:  Leave no actual opening at all, but add trim and buttons to mimic one.

Option 4:  Abandon the entire cockamamie exercise.  My sweater cuffs stretch, so why do they need buttons anyway?

Guess which option I chose (Hint: Hardest. Possible. Way.) ?

#4 was out because omitting buttons means less decoration.  Have we met?

#3 made my teeth itch.  I hate fake pocket welts, shirts with no top button, and all other construction shortcuts that limit my wearing options.

#1 wouldn't work because it would force me to fold my ribbon trim in half over the edge, messing up my surface design concept.

I picked #3:

DSC_0147.JPG

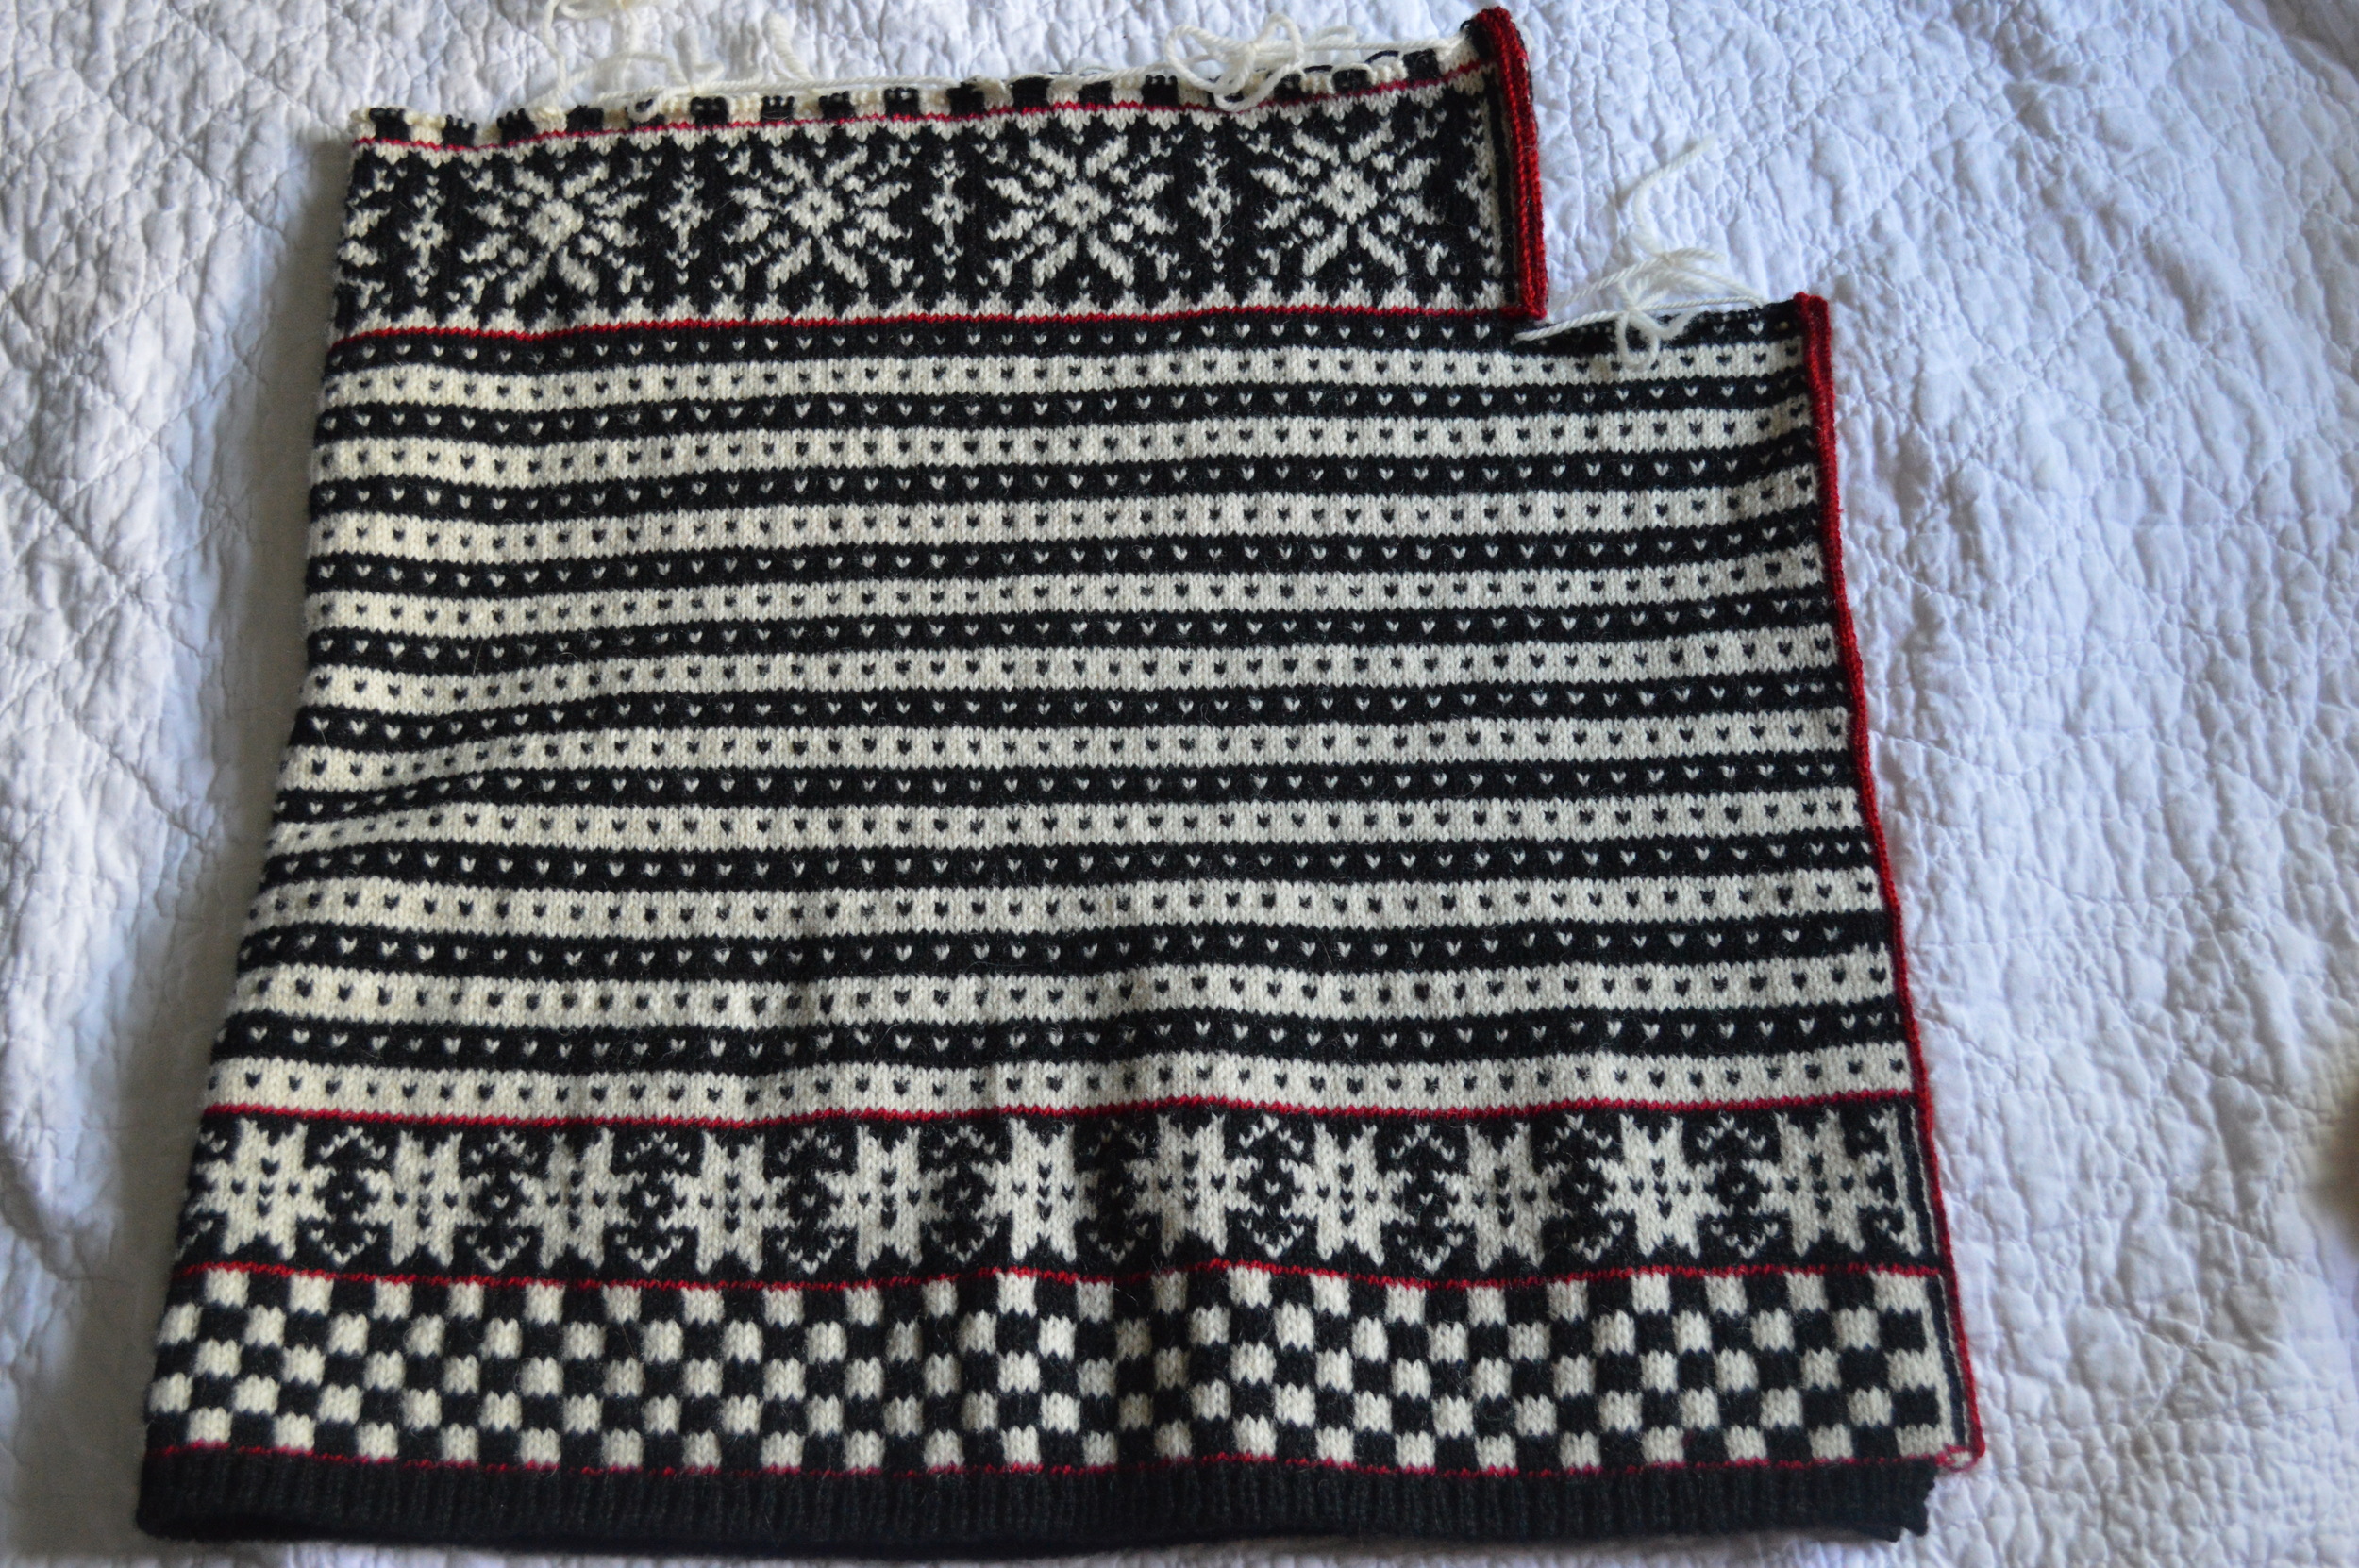
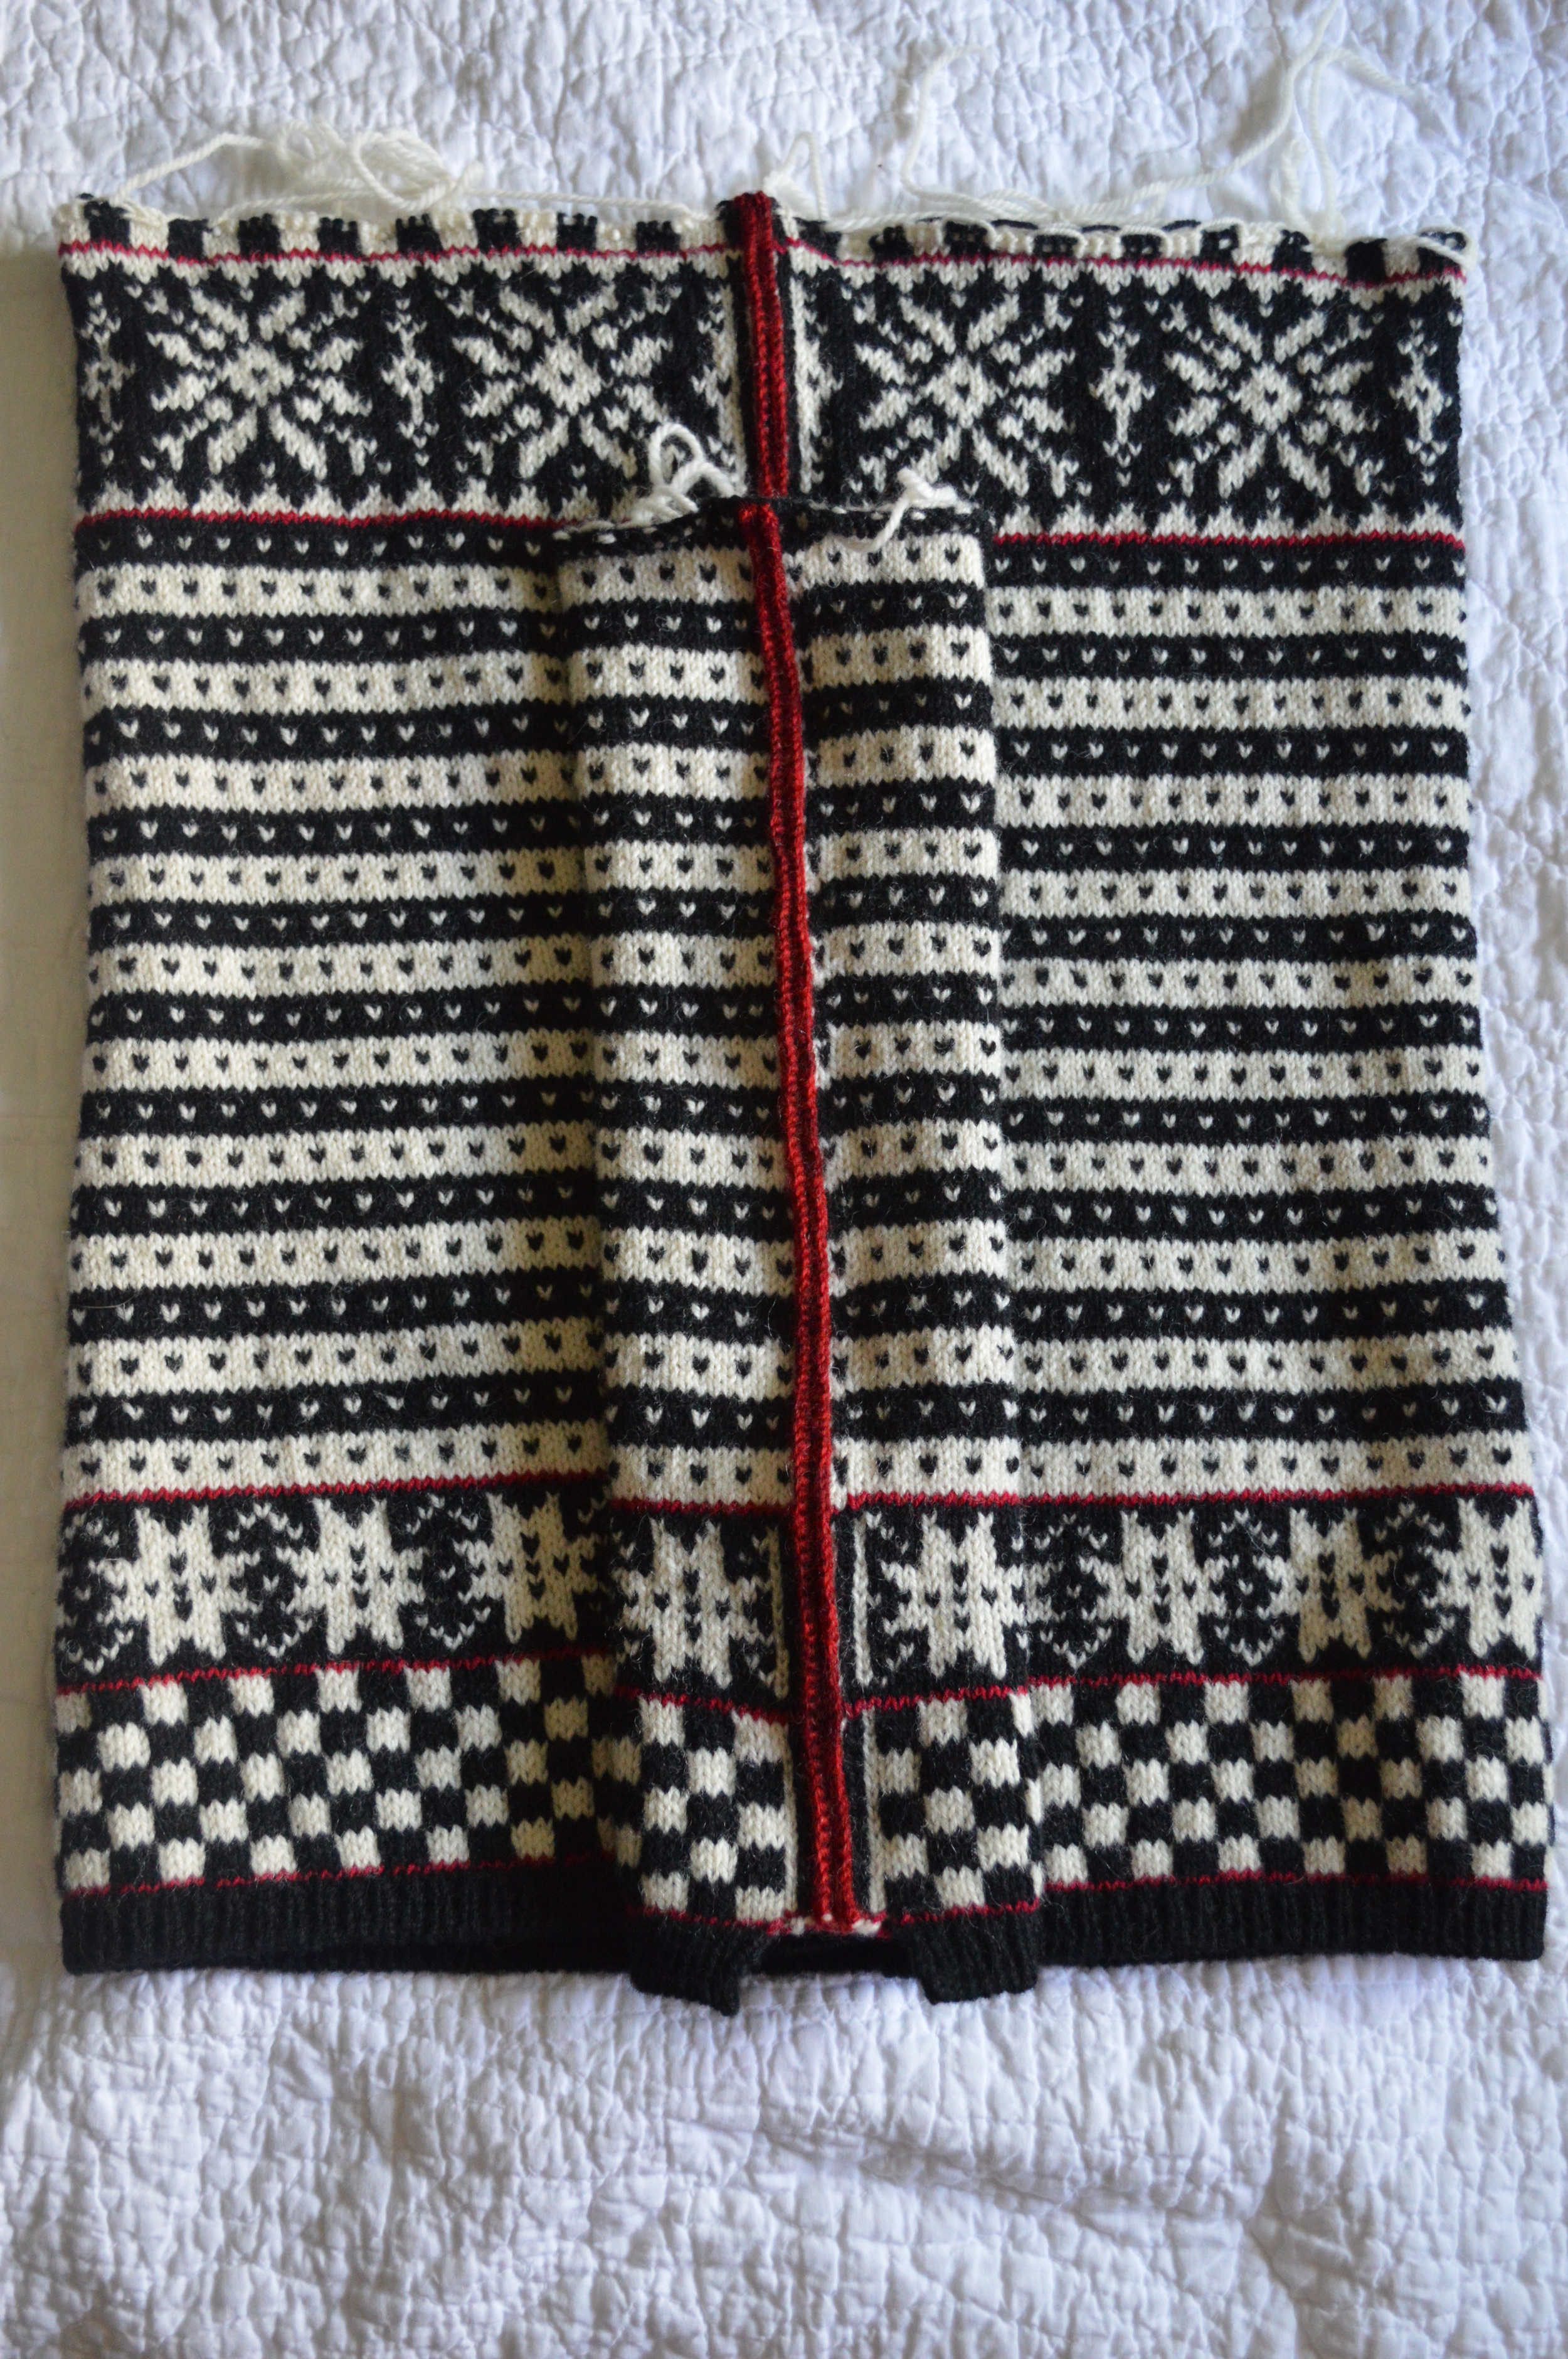
First I worked 2 cuffs together, with steeks in between.

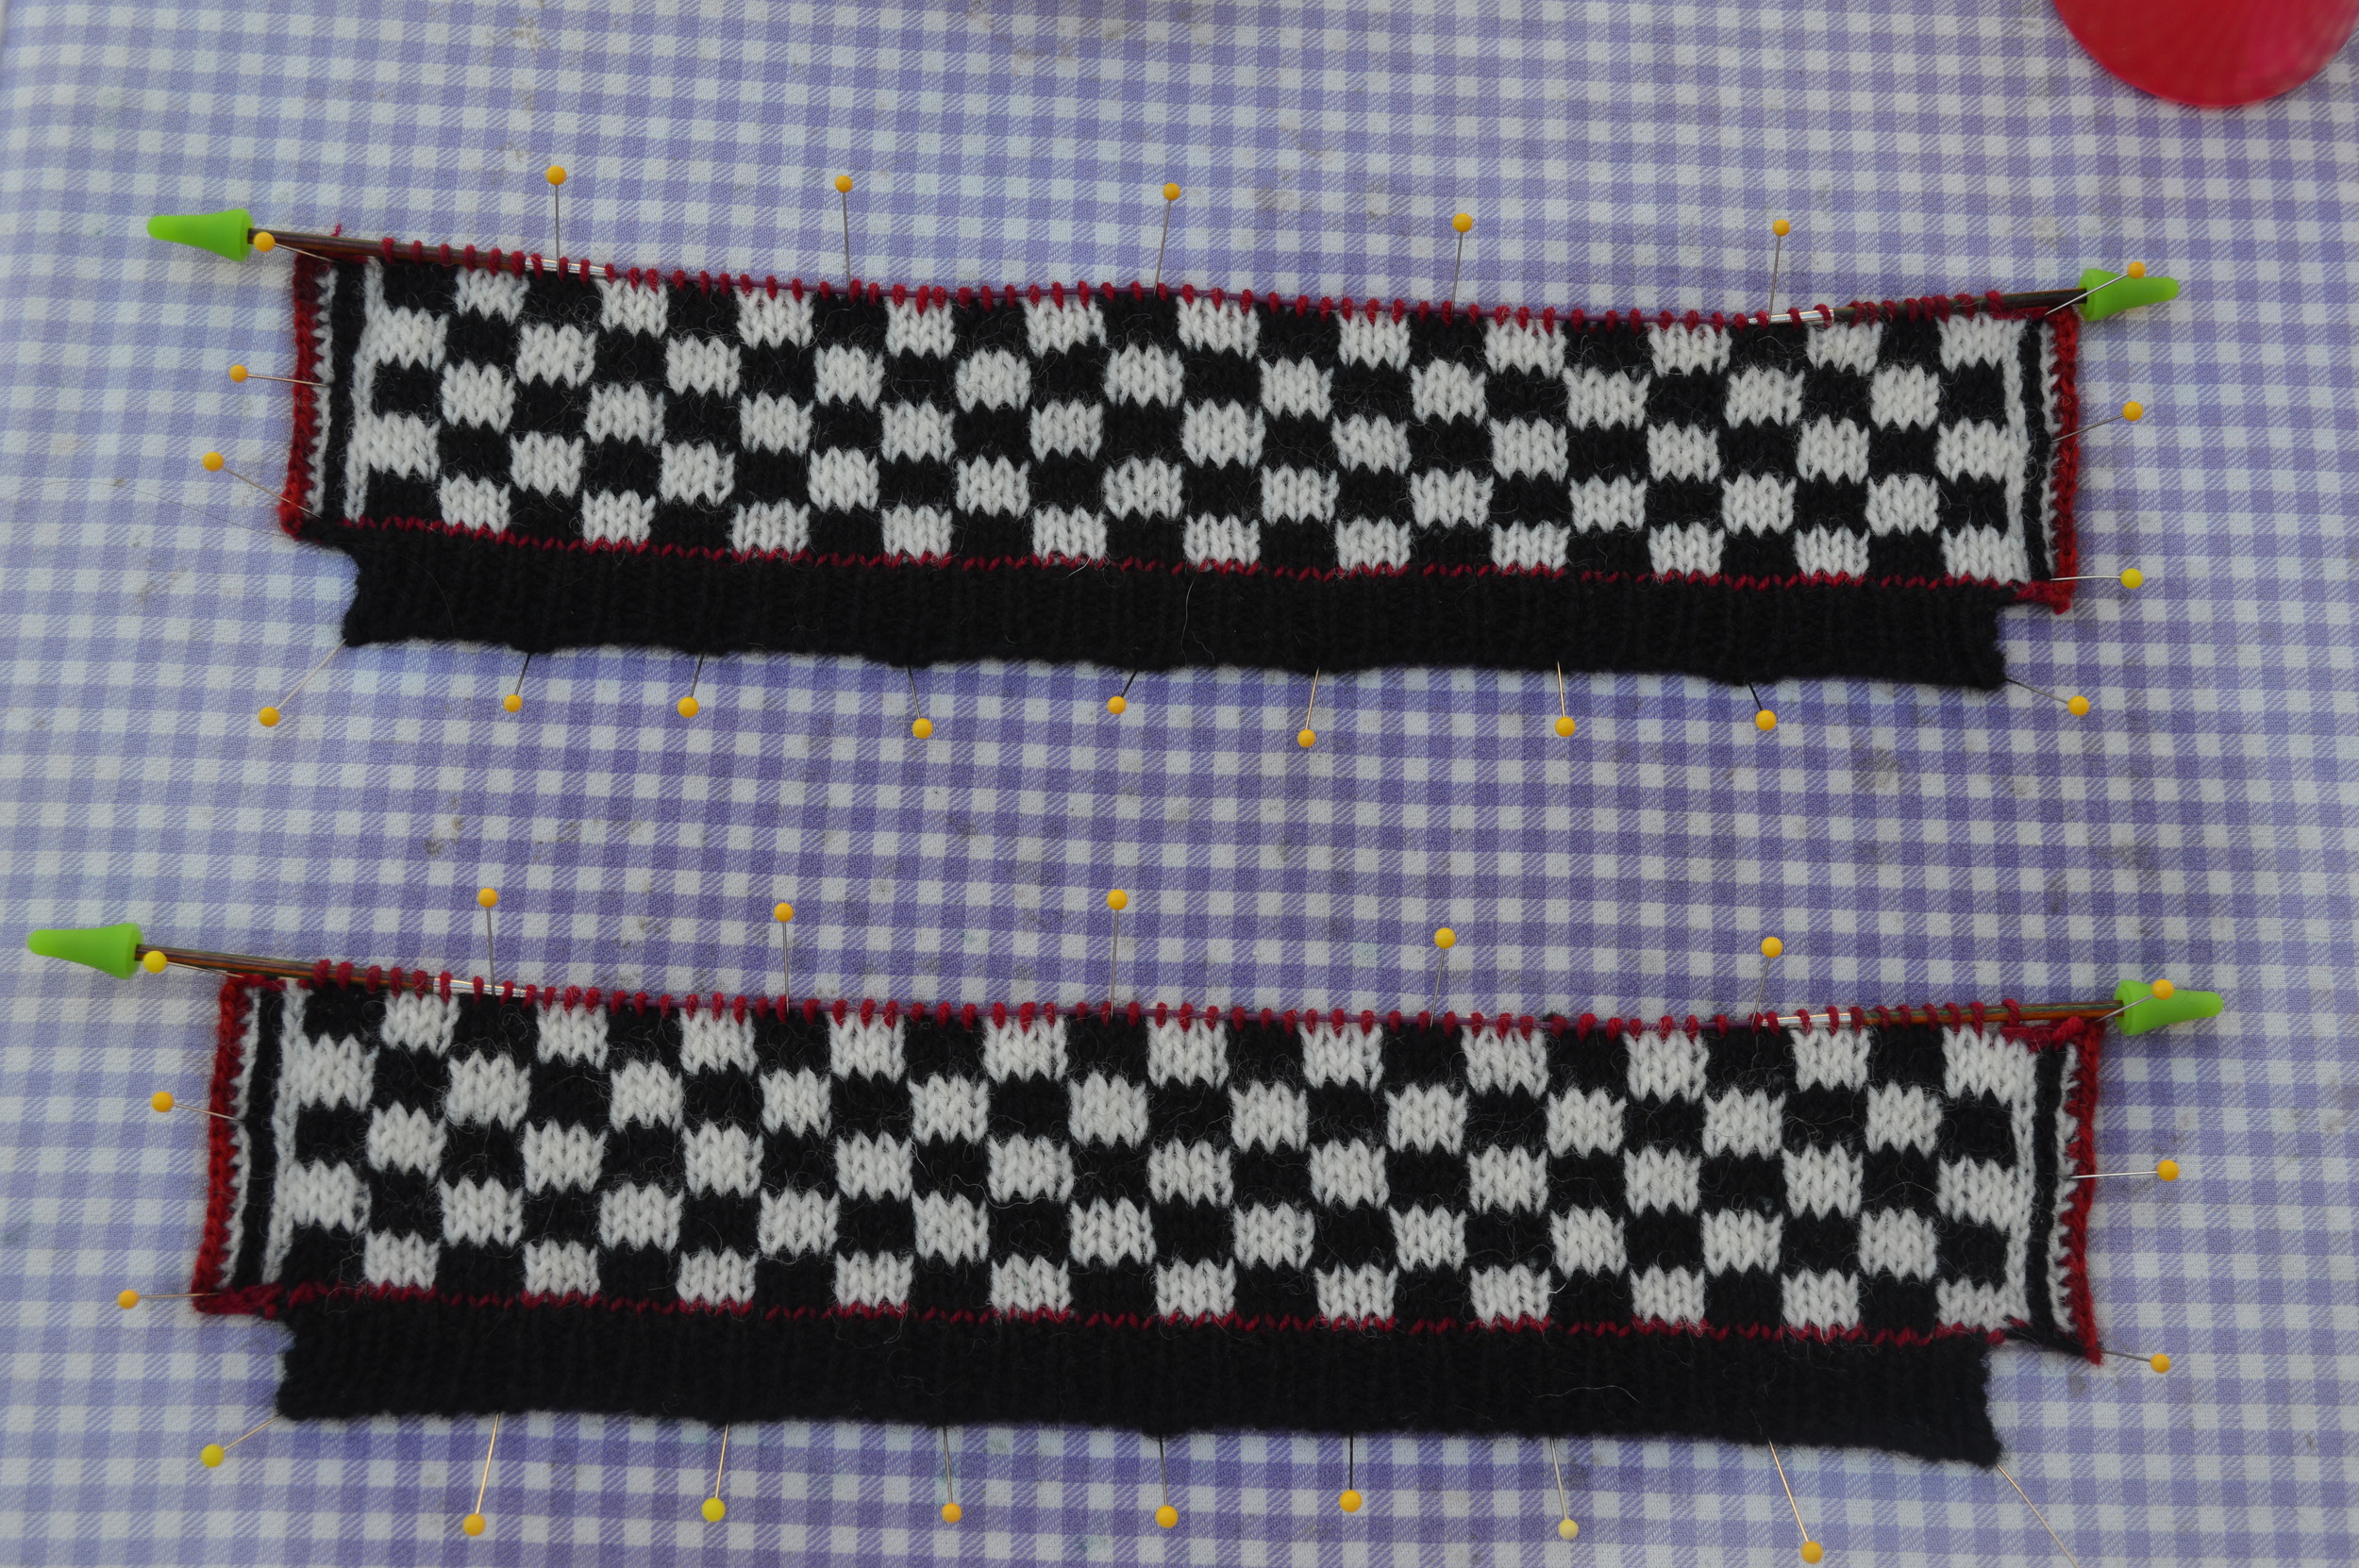
Then I cut them apart.  The steek edges turn under like a hemmed edge on each end. Live stitches are held on short circular needles in this photo.

I won't sugar-coat it: getting the location of the opening right on the needles, then centering the pattern above it, then reversing everything for the second sleeve was not the rollicking hoot I had hoped for. Maybe I'm, dyslexic, but the whole right/left thing made my panties twist. But I prevailed!  Those cuffs are exactly where I wanted them, HOW I wanted them.  

And then the Norwegian book about Fana sweaters finally arrived from Australia.

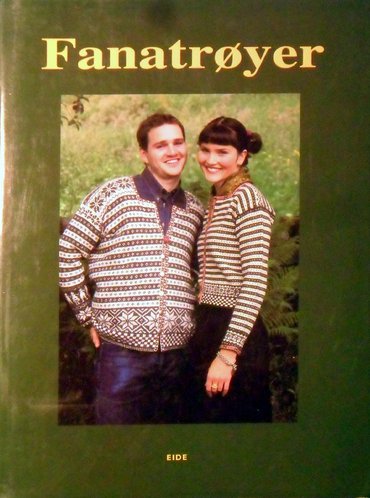
This book answered all of my prayers for information.  And even though I don't speak Norwegian, I do speak photographs.  And do you know what's in every single photo of every single cuff?

Openings in line with the underarm increases.  Hundreds of Fana sweaters cataloged and photographed, and not a SINGLE ONE with anatomical, offset cuffs, like mine.  So even though I got it right, I'm still wrong.

I had bizarrely found the only photograph of the only offset-cuff Fana in existence, and killed myself to copy it, in a misguided attempt to follow tradition.

I know enough about knitting to understand that the techniques which become traditional do so because they 1) serve a purpose (getting Olaf's ham-hands through a close-fitting cuff), and 2) are simple to execute (cuff-opening located at underside of sleeve = intuitive + easy to knit). I should have listened to my creeping suspicion that multiple generations of Norwegian knitters were not working this hard.

I've decided to love my anatomical cuffs, anyway, in spite of their being anomalies.  Because now I have something interesting to tell my classes about Fana sweater construction.  I feel proud to have made this mistake for you, so now you don't have to.  

Just one more service I provide.


All Stars

My Fana is inching toward the finish line.  Yesterday I worked the neckline and center front steeks.  Wanna see?

Steek 1.JPG

If you've read your Elizabeth Zimmermann, you'll recognize this as a "Kangaroo Pouch" construction (Elizabeth didn't invent it, though, Norway and/or Scotland did). I worked a cylinder of knitting up as far as the base of the square neckline (the lower edge of the big star border).  Then I put the neckline stitches on waste yarn holders, and cast on a new steek in the following row.  

Here's a closer look at my neckline steek.

It's easier to understand the kangaroo pouch when you see it folded along the center front and center back.  See the square neckline?

Here's another front view.  Like my sexy red crochet steek?  I always use contrast yarn for crochet steeks.  Don't know why.  Just like it better that way.

After this photo, I cut the steeks open and sent it for a well-earned, relaxing bath in the kitchen sink.  When the yarn got wet, it actually smelled like sheep and hay.  Pure bliss.

After its luxury spa treatment, I made it straighten up and fly right.  One pin every inch, every edge.  I'm always amazed at this point how much knitting is in a sweater.  It's just so much acreage when it's all stretched out flat.

I'd call this roughly the halfway point.  Next I'll make sleeves, then armholes, then do the finishing.  

I made a mistake with my uppermost border.  It actually should have been another set of stripes, rather than more checks.  I'm not sure why I failed to check that detail before I knitted it. Looking at photos, I can't find a single Fana with checks up there; it's always stripes.  But you know what? I like the checks, and it's already cut, so there.  And it's a non-traditional Fana anyway, because I couldn't control myself and put those red stripes in.  Save me a seat in Knitting Jail.

How to Make a Kiltmaker's Pincushion

I promised my pal Dave from Kilt school that I'd send him some of my favorite Japanese sewing needles.  Which immediately shifted to the rear burner when I got home and remembered I had to finish writing a book.  And writing two new classes.  And making a new sweater.  Dave's been been patiently waiting through all that, just to get some needles.  I got them finally, and decided it would be nice to send a little surprise along with them.  

One peculiarity of the kiltmaking process is that the maker needs a pincushion that can be operated with one hand.  When you reach for a pin, your other hand is always holding a pleat firmly in place.  And most pincushions lift off the table when you grab a pin one-handed. And yes, those magnetic thingys are heavy enough to stay put, but you can't be assured of grabbing the non-pointy end of the pin every time. Ow.

So, self-proclaimed Clever Beastie that I am, I decided to solve the problem, while making a weighted pincushion for Dave.

At the end of every kilt, there are leftover scraps from where each pleat is cut away.  I thought it would be a fun forget-me-not to use some of mine for Dave's surprise.  I cut two scraps into circles, and applied some iron-on interfacing to their backs (kilt tartan, though heavy, is actually somewhat loosely-woven, so the interfacing will keep the twill firm).  Then I cut two more, slightly smaller circles from scrap fabric.  The size of my pincushion was dictated by the size of my tartan scraps; about 5 1/2 " in diameter.

Pincushion 2.JPG

I considered several options for material to weight the pincushion. Pennies would be too hard to tuft through.  Fishing weights were too expensive.  Beans or rice might mildew in time. Buckshot would have been ideal, but I was all fresh out and much too lazy to procure any. Finally I just pilfered a handful of pebbles from my neighbor's footpath.  I washed them with soap and water in a strainer and let them dry completely.  Next, I stitched the two smaller circles together, leaving an opening for pebble-insertion.  Sidebar: Barb Tewksbury, our kiltmaking teacher, is a geologist by trade.  I feel sure she'd approve of the rocks.

Pincushion 3.JPG

I stitched my tartan circles together, leaving an opening for stuffing, and poked the bag-o-rocks inside.

With the pebble packet on the bottom, I stuffed the upper part of the cushion firmly with wool roving, and sewed the opening closed by hand.

Pincushion 5.JPG

I threaded about 2 yds of narrow ribbon through the longest ribbon embroidery needle in my collection, and stabbed it straight through the cushion from top to bottom.  It took a few attempts to wiggle the tip of the needle through the pebbles and make it come up in the center of the bottom, but eventually I got it right.  I used a thimble and pliers to work the needle through all the layers, and left a tail of ribbon about 8" long on top of the cushion.

Here you can see how I made the "petals" of the cushion.  I just worked a big "stitch" with my ribbon, around the edge of the cushion, and back up through the center where I started.

Pincushion 7.JPG

I pulled the ribbon snug, then made another stitch on the opposite side of the cushion, again coming back up through the center starting point.

Pincushion 8.JPG

Here are two more ribbon wraps, just like the first.

Pincushion 9.JPG

I made a total of 6 ribbon wraps, pulling each one snugly.  Then I made a small (1/4") ribbon stitch on the underside of the pincushion, bringing the needle back up through the center of the top.  I passed each end of the ribbon through the shank of a button, knotting securely, and buried the ends inside the pincushion.

Pincushion 10.JPG

Done and Done.  I tested it, and am happy to certify that this is an Official Kiltmakers One-Handed pincushion.  I'm predicting a few more of these in my future...